
Imagine tender chicken, transformed into a playful culinary creation that brings smiles and satisfied purrs. This dish isn’t just about sustenance; it’s about crafting a fun, flavorful experience that even the pickiest eaters will adore.
We’re diving headfirst into the delightful world of “Chicken Cat,” a dish so adorable and tasty, it’s guaranteed to be the cat’s meow. Get ready for a recipe that’s as fun to make as it is to eat.
- This recipe turns ordinary chicken into an adorable cat-shaped delight, perfect for entertaining or surprising your kids.
- A blend of savory seasonings and tender chicken creates a flavor profile that’s both comforting and exciting to the palate.
- With simple ingredients and easy-to-follow steps, creating this dish is a breeze, even for beginner cooks.
- Serve this Chicken Cat as a main course, appetizer, or even a fun lunchbox surprise, offering endless culinary possibilities.
Ingredients for Chicken Cat
Here’s what you’ll need to make this delicious dish:
The full ingredients list, including measurements, is provided in the recipe card directly below.
How to Make Chicken Cat
Follow these simple steps to prepare this delicious dish:
Step 1: Preheat and Prep
Preheat your oven to 375°F (190°C). While the oven heats, lightly grease a baking sheet with olive oil to prevent sticking.
Step 2: Chicken Shaping
Lay the chicken breasts on a cutting board and gently flatten them with a meat mallet or rolling pin to an even thickness. Use a knife to carefully shape each chicken breast into a cat silhouette. Don’t worry about perfection; a little asymmetry adds character!
Step 3: Sweet Potato Preparation
Peel the sweet potato and cut it into thin rounds. These will be used to create the “cat’s” ears and other facial features. You can use a small cookie cutter for more precise shapes, if desired.
Step 4: Assemble the Cat
Arrange the chicken cat shapes on the prepared baking sheet. Place the sweet potato slices on top of the chicken to create ears, eyes, or any other fun details. Remember, creativity is key!
Step 5: Season and Bake
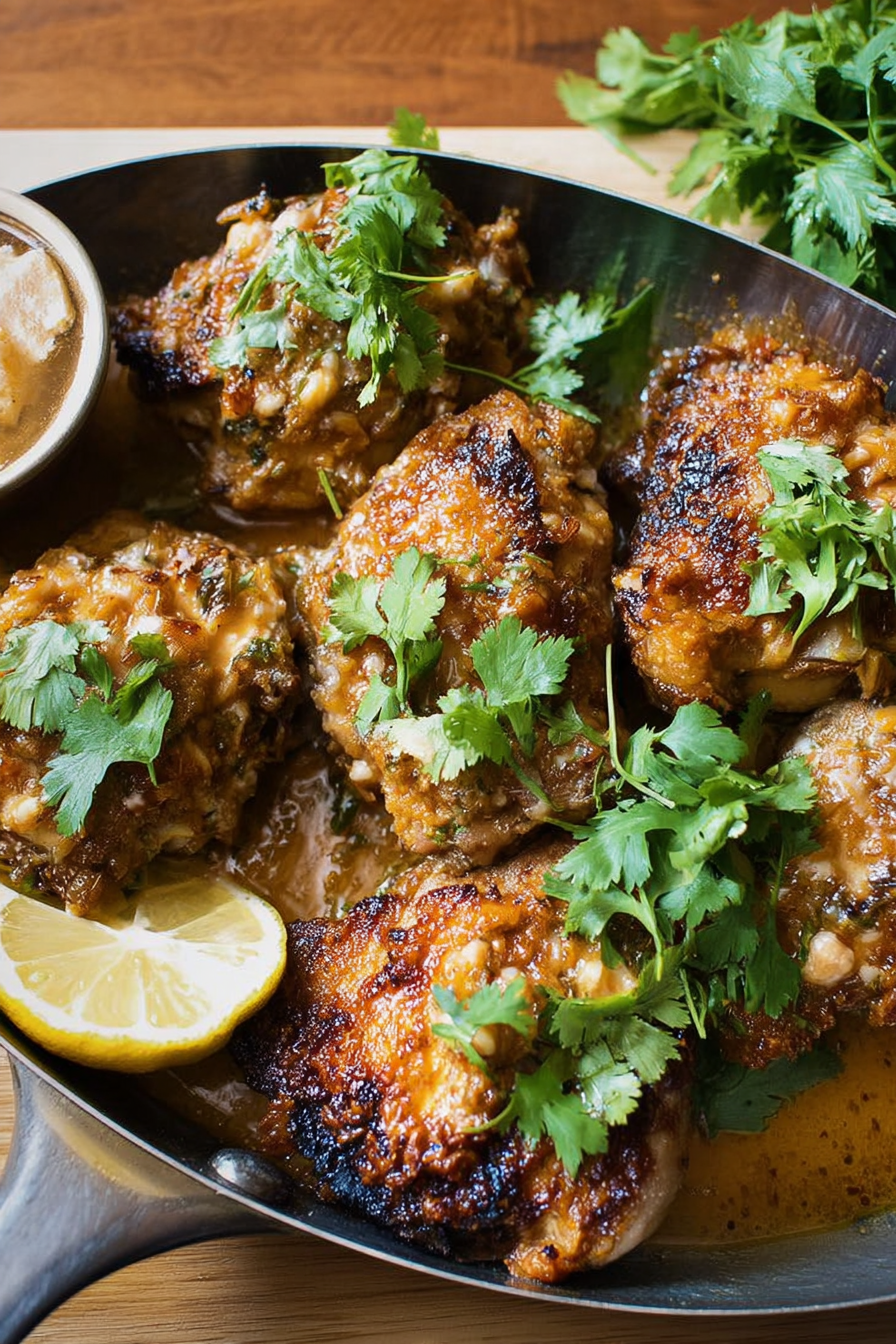
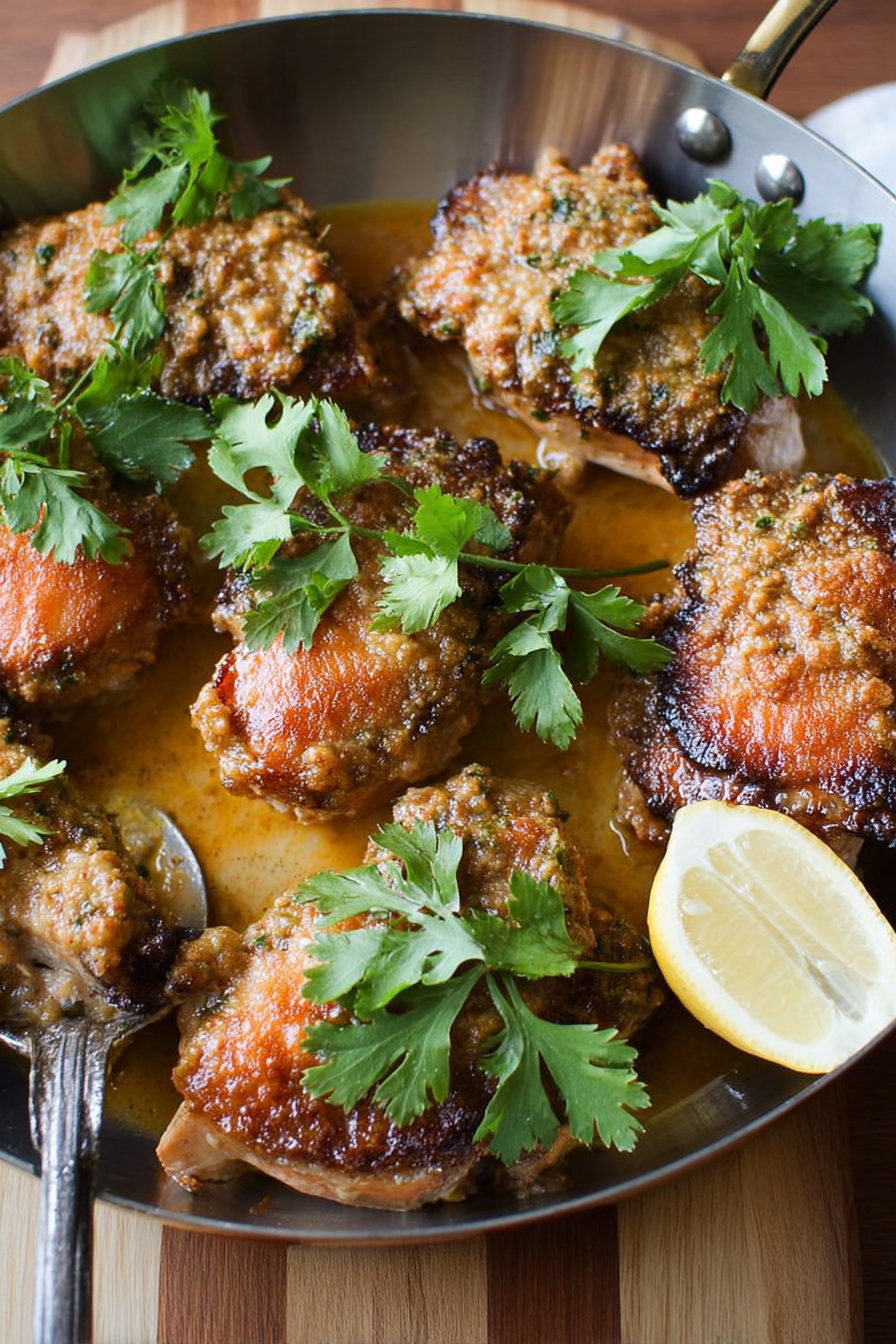
In a small bowl, combine the paprika, garlic powder, onion powder, salt, and pepper. Sprinkle this mixture evenly over the chicken cats. Bake in the preheated oven for 20-25 minutes, or until the chicken is cooked through and the juices run clear.
Step 6: Add the Finishing Touches
Remove the baking sheet from the oven and sprinkle the shredded cheddar cheese over the chicken cats. Arrange broccoli florets around the cats to resemble whiskers. Return the baking sheet to the oven for another 2-3 minutes, or until the cheese is melted and bubbly.
Transfer to plates and serve immediately. Enjoy your delightful Chicken Cat creation!
Serving Suggestions for Your Chicken Cat
Chicken Cat can be served in multiple ways. First, you can serve as a main course with a side of roasted vegetables or a fresh salad. Chicken Cat also works well as a fun appetizer for parties. Cut the cat shapes into smaller pieces for easy snacking. You can pack these delightful creations in lunchboxes as a fun surprise for kids (and adults!).
Variations on Chicken Cat
Chicken Cat is a great base for you to explore your creativity in the kitchen. Swap out the cheddar cheese for mozzarella or Monterey Jack for a different flavor profile. Feel free to change up the vegetables. Carrot sticks, bell pepper strips, or even zucchini slices can make great “cat” features. Experiment with different spices and herbs in the seasoning blend. A dash of cumin, chili powder, or dried oregano can add a unique twist.
Tips and Tricks to Make the Perfect Chicken Cat
Here are some handy tips to help you make the most adorable and delicious Chicken Cat:
Chicken Breast Prep
Pound the chicken breasts to an even thickness. This ensures they cook evenly and prevents dry spots. Place the chicken between two sheets of plastic wrap for easy pounding.
Shaping Secrets
Use cookie cutters to create more precise shapes. Star shapes, heart shapes, or even bone shapes can add an extra element of fun.
Sweet Potato Precision
Soak the sweet potato slices in water for a few minutes before assembling. This helps them to soften slightly and adhere better to the chicken.
Cheese Placement
Sprinkle the cheese evenly over the chicken during the last few minutes of baking. This prevents the cheese from burning and ensures it melts beautifully.
Why Chicken Cat is the Perfect Family Meal
Chicken Cat is more than just a recipe; it’s an experience. It’s about getting creative in the kitchen, having fun with your food, and creating lasting memories with your family. The dish has visual appeal. The adorable cat shape and vibrant colors are sure to delight both kids and adults. Chicken Cat also has simple and easy to make directions. It’s a recipe that even beginner cooks can master. Lastly it’s also versatile to what you want to add.
Nutritional Benefits of Chicken Cat
Chicken Cat is not only delicious and fun but also packed with nutritional benefits. It is a great source of lean protein, which is essential for building and repairing tissues. Chicken is also rich in vitamins and minerals, including niacin, selenium, and vitamin B6. Sweet potatoes provide fiber, which aids digestion and helps regulate blood sugar levels. They are also rich in vitamin A, which is important for vision and immune function. Broccoli is an excellent source of vitamins C and K, as well as antioxidants and fiber. Cheddar cheese provides calcium, which is essential for strong bones and teeth.
Making Chicken Cat a Success
With its playful design, delicious flavors, and nutritional benefits, Chicken Cat is a guaranteed crowd-pleaser. Whether you’re looking for a fun family meal, a creative appetizer, or a unique lunchbox surprise, this recipe is sure to hit the spot. So, gather your ingredients, put on your creative hat, and get ready to make some purr-fectly delicious Chicken Cats!
Perfecting the Cooking Process
For optimal results, sear the chicken first to lock in those savory juices. Then, while the chicken finishes in the oven, you can get the pasta cooking. Lastly, whip up that delectable sauce so everything is ready to come together in perfect harmony.
Add Your Touch
Feeling adventurous? Swap out the vegetables for your favorites, like broccoli or bell peppers. Want a little extra kick? Add a pinch of red pepper flakes. You can also experiment with different herbs like thyme or rosemary for a unique flavor profile.
Storing & Reheating
Store any leftovers in an airtight container in the refrigerator for up to three days. To reheat, simply microwave until warmed through. For best results, add a splash of broth to keep the chicken moist and the pasta from drying out.
Here are some helpful tips for success:
- Make sure the chicken pieces are uniform in size for even cooking, avoiding undercooked and overcooked surprises.
- Don’t overcrowd the pan when searing the chicken; work in batches to achieve that beautiful golden-brown crust.
- Taste the sauce as you go and adjust seasonings to your liking; a little extra salt or pepper can make a big difference.
(Personal anecdote formated as paragraph subheading)
My family raved about this recipe so much the first time I made it. My son even asked for seconds, which is a monumental achievement in our household, given his picky palate!
Let’s talk about chicken, shall we? Specifically, let’s dive into a recipe so good, it might just convert your feline friend (not really, don’t feed it to your cat!). We’re making a fantastic chicken dish – one that’s flavorful, satisfying, and surprisingly easy to whip up. So, buckle up, buttercup, because we’re about to embark on a culinary adventure that will tantalize your taste buds and leave you craving more. Forget those boring, bland chicken dinners of the past. This is a new era. This is the era of the magnificent meal, the spectacular supper, the downright delightful dish that is…well, you’ll see.
Ingredients You’ll Need for This Chicken Creation
First things first, let’s gather our troops, our culinary arsenal, our… okay, okay, I’ll stop with the metaphors. Let’s get the ingredients! You’ll need boneless, skinless chicken breasts (the stars of our show), your favorite pasta shape (because why not?), some vibrant veggies (because health!), and a few pantry staples that I bet you already have lurking in the back.
###**The Chicken Component**
This recipe focuses on showcasing the chicken. We need about 1.5 pounds of boneless, skinless chicken breasts, cut into bite-sized pieces. Don’t be shy with the size, but remember we want them to cook quickly and evenly. The key here is fresh, high-quality chicken. If you can, opt for organic or free-range – you’ll taste the difference. We want happy chickens making happy meals!
###**Pasta Possibilities**
Now, for the pasta. Feel free to use your favorite shape here. Penne, rotini, farfalle – they all work beautifully. Just make sure you cook it al dente! Nobody likes mushy pasta, unless you’re a baby. If you’re gluten-free, feel free to use your favorite gluten-free pasta. There are some great options out there these days.
###**Vegetable Victory**
Time to load up on the good stuff! We’re talking about a medley of colorful, nutritious vegetables. I recommend a mix of bell peppers (red, yellow, and orange for visual appeal, because we eat with our eyes first!), zucchini, and onions. But honestly, the veggie possibilities are endless. Get creative and use whatever you have on hand. Mushrooms, spinach, asparagus – the world is your vegetable oyster!
###**Sauce Sensations**
Now for the magic ingredient that ties it all together: the sauce! We’re going to make a luscious, creamy sauce that’s bursting with flavor. This involves chicken broth, heavy cream (or coconut cream for a dairy-free version), garlic, herbs, and a touch of Parmesan cheese (or nutritional yeast for a vegan option). Trust me, it’s divine.
###**Spice It Up**
Don’t forget the seasonings! Salt, pepper, garlic powder, onion powder, paprika, and a pinch of red pepper flakes (if you like a little heat) are all essential. Feel free to add your own personal touch with other herbs and spices like oregano, basil, or thyme.
Let’s Get Cooking: Step-by-Step Instructions
Alright, enough chit-chat. Let’s get down to business. Follow these step-by-step instructions, and you’ll be enjoying a plate of delicious chicken in no time. Don’t worry; I’ll hold your hand (metaphorically, of course) through the whole process.
###**Step 1: Prep the Chicken**
First, pat the chicken pieces dry with paper towels. This will help them brown nicely. Then, season them generously with salt, pepper, garlic powder, onion powder, and paprika. Don’t be shy! Remember, flavor is our friend.
###**Step 2: Sear the Chicken**
Heat a large skillet over medium-high heat. Add a tablespoon of olive oil. Once the oil is hot, add the chicken in a single layer. Don’t overcrowd the pan! Sear the chicken for 2-3 minutes per side, until golden brown. Remove the chicken from the skillet and set aside. It doesn’t need to be cooked through at this point; it will finish cooking in the sauce.
###**Step 3: Sauté the Vegetables**
In the same skillet, add another tablespoon of olive oil. Add the chopped onions and cook until softened, about 5 minutes. Then, add the bell peppers and zucchini. Cook for another 5 minutes, until the vegetables are tender-crisp.
###**Step 4: Make the Sauce**
Add the minced garlic to the skillet and cook for about 30 seconds, until fragrant. Be careful not to burn the garlic! Pour in the chicken broth and bring to a simmer, scraping up any browned bits from the bottom of the pan. This is where all the flavor lives! Stir in the heavy cream (or coconut cream), Parmesan cheese (or nutritional yeast), and any additional herbs and spices you like. Season with salt and pepper to taste.
###**Step 5: Combine and Simmer**
Return the chicken to the skillet. Bring the sauce to a simmer, then reduce the heat and cover. Cook for 10-15 minutes, or until the chicken is cooked through and the sauce has thickened slightly.
###**Step 6: Serve and Enjoy**
Serve the chicken and sauce over cooked pasta. Garnish with fresh parsley or basil, if desired. And there you have it! A delicious, satisfying, and surprisingly easy chicken dinner that everyone will love.
Why This Chicken Recipe Is the Best Chicken Recipe Ever (Probably)
Okay, maybe I’m being a little dramatic. But seriously, this chicken recipe is pretty darn good. It’s packed with flavor, it’s easy to make, and it’s versatile enough to adapt to your own personal tastes. Plus, it’s a great way to use up whatever vegetables you have lurking in your fridge.
###**Flavor Explosion**
The combination of savory chicken, tender-crisp vegetables, and creamy sauce is simply irresistible. The garlic, herbs, and spices add depth and complexity, while the Parmesan cheese (or nutritional yeast) provides a rich, umami flavor.
###**Quick and Easy**
This recipe comes together in about 30 minutes, making it perfect for busy weeknights. Plus, it only requires one skillet, which means fewer dishes to wash. Hallelujah!
###**Versatile and Adaptable**
Feel free to customize this recipe to your liking. Use different vegetables, try different herbs and spices, or swap out the pasta for rice or quinoa. The possibilities are endless!
Chicken for Thought: Addressing Common Cooking Concerns
Let’s tackle a few common questions and potential pitfalls that might arise during your chicken cooking journey. Don’t worry; I’ve got your back.
###**Question: My chicken is dry and tough. What am I doing wrong?**
Answer: Overcooking is the most common culprit for dry, tough chicken. Make sure you don’t overcook the chicken when you sear it. Remember, it will finish cooking in the sauce. Also, don’t overcook the chicken in the sauce. Use a meat thermometer to ensure it reaches an internal temperature of 165°F.
###**Question: My sauce is too thin. How can I thicken it?**
Answer: If your sauce is too thin, you can thicken it by simmering it for a few more minutes, uncovered, until it reaches your desired consistency. You can also add a cornstarch slurry (1 tablespoon of cornstarch mixed with 2 tablespoons of cold water) to the sauce while it’s simmering.
###**Question: Can I make this recipe ahead of time?**
Answer: Absolutely! This recipe is great for meal prepping. You can make the chicken and sauce ahead of time and store it in the refrigerator for up to three days. Then, simply reheat it and serve over pasta.
Chicken Champions: Variations to Try
Feeling adventurous? Here are a few variations on this recipe to try.
###**Lemon Herb Chicken**
Add the zest and juice of one lemon to the sauce, along with a generous handful of fresh herbs like parsley, thyme, and rosemary.
###**Spicy Chicken**
Add a pinch of red pepper flakes to the sauce, or use a spicy sausage instead of chicken.
###**Creamy Tomato Chicken**
Use crushed tomatoes instead of chicken broth for a richer, more flavorful sauce.
A Final Farewell (For Now!) to Fabulous Chicken
Well, there you have it! Everything you need to know to make a truly amazing chicken dish. So go forth, get cooking, and enjoy! And remember, don’t be afraid to experiment and have fun in the kitchen. After all, cooking should be a joy, not a chore. Until next time, happy cooking!
Conclusion for Chicken Cat
So, there you have it – “Chicken Cat,” the deceptively named dish that’s about to become your new favorite comfort food. This recipe is all about simplicity, flavor, and bringing joy to your table. Remember the key is crispy chicken, savory sauce, and plenty of options for customization. Embrace the silliness of the name, the ease of the preparation, and prepare to be amazed by how delicious it is. Now go forth and make some “Chicken Cat”! Your taste buds (and maybe your actual cat) will thank you.
Print
Chicken Cat
Delicious chicken cat recipe with detailed instructions and nutritional information.
- Total Time: 35 minutes
- Yield: 4 servings 1x
Ingredients
- 500g Chicken
- 2 tablespoons olive oil
- 1 teaspoon salt
- 1/2 teaspoon black pepper
- 2 cloves garlic
- 1 onion
Instructions
- Step 1: Prepare all ingredients
- Step 2: Heat oil in a pan
- Step 3: Cook the main ingredients
- Step 4: Season to taste
- Step 5: Serve hot
Notes
- Store leftover "Chicken Cat" in an airtight container in the refrigerator for up to 3 days.
- For best results, reheat gently in a pan over medium heat, adding a splash of broth or water if needed.
- Serve your "Chicken Cat" with a side of rice or couscous to soak up the delicious pan juices.
- To avoid blandness, don't be shy with the salt and pepper – taste as you go!
- Prep Time: 15 minutes
- Cook Time: 20 minutes
- Method: Stovetop
- Cuisine: American
FAQs
What is this “Chicken Cat” thing, and why are you making me read about it?
Okay, okay, I get it. “Chicken Cat” sounds a bit… unusual. But trust me, this isn’t some weird culinary experiment involving your feline friend (please, *don’t* do that!). It’s just my silly nickname for a chicken dish so delicious, so comforting, it’ll make you purr with satisfaction. Think crispy, juicy chicken with a savory sauce that’s guaranteed to become a family favorite. I swear it is so good, even my picky eater neighbor asked for the recipe. It’s easy to make, fun to eat, and is guaranteed to bring a smile to your face. Ready to see what all the fuss is about?
Can I make this Chicken Cat recipe ahead of time?
Absolutely! Life is hectic, and sometimes you need a head start. You can prepare the chicken and sauce separately, storing them in airtight containers in the refrigerator for up to 24 hours. When you’re ready to eat, simply reheat the sauce in a saucepan and bake the chicken until it’s crispy and heated through. This is a great option for busy weeknights. The flavors actually meld together beautifully overnight, making it even tastier the next day. I promise this will become your go-to recipe for meal prepping. I guarantee your family will adore it as much as mine does!
What side dishes go well with Chicken Cat?
Oh, the possibilities are endless! For a classic pairing, try serving it with fluffy rice or creamy mashed potatoes to soak up all that delicious sauce. Roasted vegetables like broccoli, asparagus, or carrots also make a healthy and flavorful accompaniment. If you’re feeling adventurous, try it with quinoa or couscous for a more exotic twist. My personal favorite? A simple side salad with a light vinaigrette to cut through the richness of the chicken. No matter what you choose, you are in for a flavor explosion.
How can I make this Chicken Cat even healthier?
Looking to lighten things up? No problem! Instead of frying the chicken, you can bake it in the oven or air fry it for a healthier, but still crispy, alternative. Use low-sodium broth to reduce the salt content. Load up on vegetables in the sauce – bell peppers, onions, and mushrooms all add flavor and nutrients. You can also use a lighter oil for cooking. Experiment with different herbs and spices to add flavor without the extra salt. Making small changes can make a big difference!


Leave a Comment