
Picture this: a dessert so easy, so delightful, that it practically makes itself. Imagine a creamy, dreamy cheesecake without the fuss of baking – a true sweet symphony of simplicity.
We’re talking about *No-Bake Cheesecake Perfects: A Sweet Symphony of Simplicity*, a recipe that will have you wondering why you ever bothered turning on the oven in the first place. It’s the kind of dessert that brings back memories of summer afternoons and carefree indulgence.
Why you’ll adore this recipe:
- Effortlessly achieve a luscious, creamy cheesecake texture without ever turning on your oven.
- Delight in the harmonious blend of tangy cream cheese and a hint of bright lemon zest.
- Showcase an elegant dessert with minimal effort, perfect for gatherings or a sweet personal treat.
- Customize with your favorite toppings, from fresh berries to a decadent chocolate ganache, making it your own.
Ingredients for No-Bake Cheesecake Perfects: A Sweet Symphony of Simplicity
Here’s what you’ll need to make this delicious dish:
The full ingredients list, including measurements, is provided in the recipe card directly below.
How to Make No-Bake Cheesecake Perfects: A Sweet Symphony of Simplicity
Follow these simple steps to prepare this delicious dish:
Step 1: Prepare the Graham Cracker Crust
In a food processor, pulse the graham crackers until they become fine crumbs. Alternatively, place them in a ziplock bag and crush them with a rolling pin. In a medium bowl, combine the graham cracker crumbs with the melted butter. Press the mixture firmly into the bottom of a 9-inch springform pan. Place the pan in the refrigerator to chill while you prepare the filling.
Step 2: Whip the Cream
In a large, chilled bowl, use an electric mixer to whip the heavy cream until stiff peaks form. Be careful not to overwhip. Set aside.
Step 3: Make the Cheesecake Filling
In a separate large bowl, beat the softened cream cheese and granulated sugar together until smooth and creamy. Add the Alcohol-free vanilla extract and lemon juice, and mix until well combined.
Step 4: Combine the Filling and Cream
Gently fold the whipped cream into the cream cheese mixture until evenly combined. Be careful not to deflate the whipped cream.
Step 5: Assemble and Chill
Pour the cheesecake filling over the chilled graham cracker crust. Smooth the top with a spatula. Cover the springform pan with plastic wrap and refrigerate for at least 4 hours, or preferably overnight, to allow the cheesecake to set completely.
Step 6: Serve and Enjoy
Once the cheesecake is set, remove it from the refrigerator. Carefully release the sides of the springform pan. Decorate with your favorite toppings, such as fresh berries, chocolate shavings, or a dusting of cocoa powder. Slice and serve. Enjoy your delightful No-Bake Cheesecake Perfects!
Perfecting the Cooking Process

To achieve the ultimate symphony of flavors in this culinary delight, follow this straightforward dance. First, blend your base ingredients thoroughly. Then, let the mixture set properly for a delectable texture. This ensures each element complements the next perfectly.
Add Your Touch
Unleash your inner artist! Why not swap lemon juice for lime to inject a zesty twist? Or, consider adding a hint of Alcohol-free vanilla extract for an extra layer of sweetness. The possibilities are endless, so go wild and create your own masterpiece.
Storing & Reheating
Keep your masterpiece fresh by storing it in an airtight container in the refrigerator. This maintains its delightful texture. When ready to enjoy again, serve chilled for the best experience. Simple, right?
- Ensure the ingredients are at room temperature for smoother mixing, especially the cream cheese.
- Avoid over-mixing the batter to prevent a dense texture; gently fold ingredients until just combined.
- Chill the assembled dessert for at least four hours to allow the flavors to meld and set properly.
(Personal anecdote formated as paragraph subheading)
I once brought this very dessert to a potluck. The plate was cleaned in minutes, and I had to share the recipe five times! It’s a guaranteed crowd-pleaser, trust me.
Let’s dive into the delectable world where “No-Bake Cheesecake Perfects: A Sweet Symphony of Simplicity” reigns supreme. We’re not talking about fussy baking, finicky ovens, or praying to the culinary gods that your dessert doesn’t collapse. Nope, we’re talking about pure, unadulterated, no-bake bliss. Get ready to embrace the easiest, most satisfying dessert you’ll ever whip up.
Why No-Bake? Oh, Let Me Count the Ways
Forget sweating over a hot oven. No-bake desserts are the superheroes of the dessert world. They swoop in to save the day when you’re short on time, energy, or patience. Plus, they’re ridiculously easy to customize. Think of this recipe as a blank canvas for your dessert dreams.
Imagine this: It’s a scorching summer day. The last thing you want to do is turn on the oven. But suddenly, the craving for a creamy, dreamy cheesecake hits you like a ton of bricks. What do you do? Enter the no-bake cheesecake, your personal dessert savior. It’s cool, refreshing, and requires zero baking skills. What’s not to love?
Another reason to adore this dessert? It’s almost impossible to mess up. Seriously. As long as you can stir and chill, you’re golden. Baking, on the other hand, requires precision and a whole lot of luck. With this recipe, you can throw caution to the wind and still end up with a show-stopping dessert.
Gather ‘Round, Ingredient Avengers!
Before we embark on this epic dessert journey, let’s gather our trusty ingredients. Don’t worry, you probably have most of these in your pantry already.
- **Graham Crackers:** The foundation of our kingdom. They provide the perfect crunchy base. (Consider using gluten-free graham crackers for a dietary-friendly twist!)
- **Unsalted Butter:** The glue that holds our kingdom together. It binds the graham cracker crumbs into a glorious crust.
- **Cream Cheese:** The star of the show! Make sure it’s full-fat for the creamiest, most decadent results.
- **Sweetened Condensed Milk:** The secret weapon! It adds sweetness and richness without the need for baking.
- **Lemon Juice:** A burst of brightness that cuts through the richness and adds a delightful tang.
- **Alcohol-free vanilla extract:** Because every great dessert needs a touch of vanilla magic.
- **Your Favorite Toppings:** Fresh berries, chocolate shavings, whipped cream – the possibilities are endless!
Crafting the Crusader Crust
Our first mission: building the graham cracker crust. This is where the magic begins. It’s super simple, I promise.
1. **Crush the Graham Crackers: ** Place your graham crackers in a zip-top bag and unleash your inner Hulk. Crush them into fine crumbs using a rolling pin, food processor, or even the bottom of a mug. (Therapy in dessert-making, who knew?)
2. **Melt the Butter: ** In a microwave-safe bowl, melt the butter until it’s completely liquid. (Microwave in 30-second intervals to avoid explosions.)
3. **Combine and Conquer: ** Pour the melted butter over the graham cracker crumbs and mix until everything is evenly moistened. The mixture should resemble wet sand.
4. **Press into Pan: ** Press the mixture firmly into the bottom of a springform pan or pie dish. Use the bottom of a measuring cup to ensure an even layer.
5. **Chill Out: ** Place the crust in the freezer for at least 15 minutes to firm up. This will prevent it from crumbling when you add the filling.
Filling
: The Heart of the Hero
Now for the pièce de résistance: the cheesecake filling! This is where the “sweet symphony of simplicity” really shines.
1. **Cream Cheese Tango: ** In a large bowl, beat the cream cheese until it’s smooth and fluffy. This is crucial for a creamy, lump-free filling.
2. **Sweetness Overload: ** Gradually add the sweetened condensed milk, beating until well combined.
3. **Tangy Twist: ** Stir in the lemon juice and Alcohol-free vanilla extract. The mixture will thicken slightly.
4. **Pour and Prepare for Glory: ** Pour the filling over the chilled graham cracker crust, spreading it evenly.
5. **Chill Time: ** Cover the cheesecake with plastic wrap and refrigerate for at least 4 hours, or preferably overnight. This allows the filling to set completely and the flavors to meld.
Toppings
: The Grand Finale
Once your cheesecake has chilled to perfection, it’s time for the grand finale: the toppings! This is where you can really let your creativity shine.
- **Fresh Berries:** Strawberries, raspberries, blueberries – a classic choice that adds color and freshness.
- **Chocolate Shavings:** Dark, milk, or white chocolate – take your pick!
- **Whipped Cream:** Homemade or store-bought, a dollop of whipped cream adds a touch of indulgence.
- **Fruit Compote:** A homemade fruit compote adds depth and complexity.
- **Caramel Sauce:** Drizzle with caramel sauce for extra sweetness.
- **Lemon Zest:** A sprinkle of lemon zest adds a pop of flavor and visual appeal.
Variations
: Remixing the Magic
Want to take your no-bake cheesecake to the next level? Try these delicious variations:
- **Chocolate Cheesecake:** Add melted chocolate or cocoa powder to the filling for a decadent chocolate twist.
- **Peanut Butter Cheesecake:** Swirl peanut butter into the filling for a Reese’s-inspired treat.
- **Lemon Raspberry Cheesecake:** Add raspberry puree and lemon zest to the filling for a tangy and fruity delight.
- **Oreo Cheesecake:** Crush Oreos into the crust and filling for an cookies-and-cream sensation.
Perfecting the Cooking Process
For optimal outcomes, prepare the crust first, allowing it to chill while you mix the filling. Ensure all filling ingredients are well combined before pouring over the crust. This sequence guarantees a smooth and perfectly set dessert.
Add Your Touch
Feeling adventurous? Replace graham crackers with chocolate wafers or ginger snaps for the crust. Experiment with different fruit extracts to infuse unique flavors. Consider adding a layer of fruit preserves between the crust and filling.
Storing & Reheating
Store the finished cheesecake in the refrigerator, covered, for up to three days. Avoid freezing, as it can alter the texture. Serve directly from the fridge for the most enjoyable experience.
- Use a high-quality springform pan to ensure easy release and a clean, professional presentation.
- Consider using a food processor for the graham cracker crust to achieve uniformly fine crumbs.
- Gently tap the filled cheesecake on the counter to release any trapped air bubbles before chilling.
(Personal anecdote formated as paragraph subheading)
My friend, notorious for kitchen disasters, made this cheesecake and it was a hit! If she can do it, anyone can. It’s foolproof, I swear!
This “No-Bake Cheesecake Perfects: A Sweet Symphony of Simplicity” is not just a dessert; it’s an experience. It’s a reminder that great food doesn’t have to be complicated. So go ahead, embrace the simplicity and whip up this creamy, dreamy masterpiece. Your taste buds will thank you! Enjoy this delectable treat.
Conclusion for No-Bake Cheesecake Perfects: A Sweet Symphony of Simplicity
This No-Bake Cheesecake is more than just a dessert; it’s a testament to how incredibly simple and amazingly delicious life can be. We’ve covered the core components: an effortless crust, a creamy, dreamy filling, and the freedom to customize it with your favorite toppings. Remember to chill it properly for the best texture. This recipe promises a delightful and stress-free dessert experience. So, go ahead, whip up this sweet symphony, and prepare to be amazed!
Print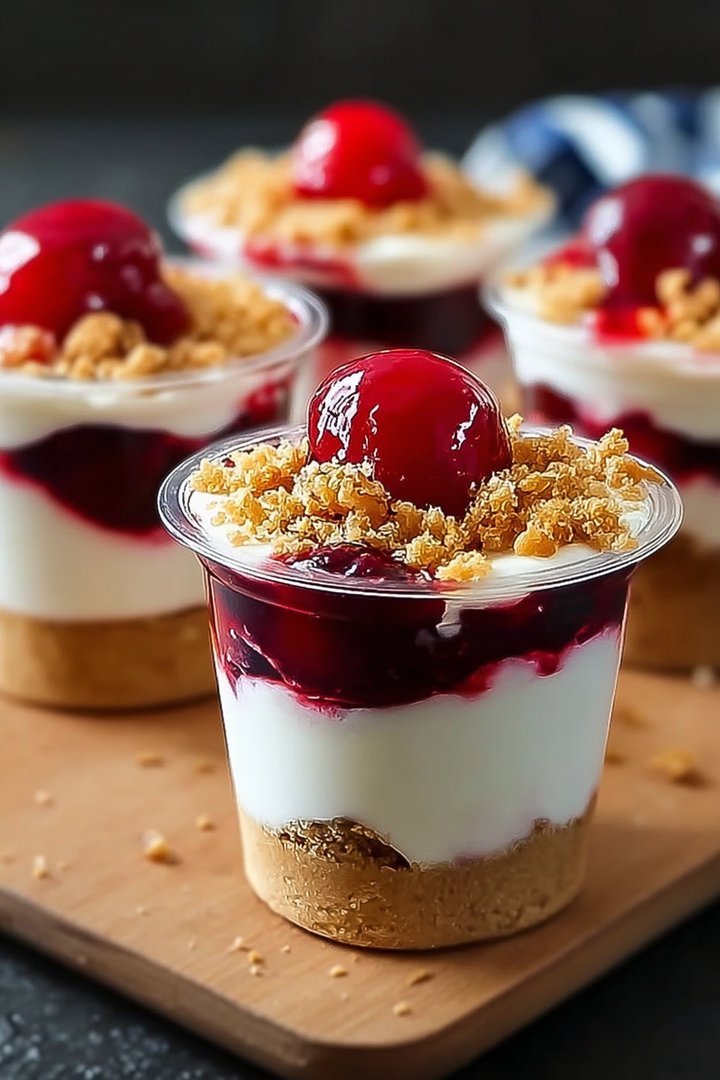
No-Bake Cheesecake Perfects: A Sweet Symphony of Simplicity
Delicious no-bake cheesecake perfects: a sweet symphony of simplicity recipe with detailed instructions and nutritional information.
- Total Time: 35 minutes
- Yield: 4 servings
Ingredients
- Graham crackers: 1 1/2 cups, finely crushed
- Unsalted butter: 6 tablespoons, melted
- Cream cheese: 2 (8-ounce) packages, softened
- Sweetened condensed milk: 1 (14-ounce) can
- Lemon juice: 1/4 cup
- Vanilla extract: 1 teaspoon
- Whipped topping: 1 (8-ounce) container, thawed
Instructions
- Step 1: In a medium bowl, combine the crushed graham crackers and melted butter. Press the mixture firmly into the bottom of a 9-inch springform pan.
- Step 2: In a large bowl, beat the softened cream cheese with an electric mixer until smooth and creamy.
- Step 3: Gradually add the sweetened condensed milk to the cream cheese, beating until well combined. Stir in the lemon juice and vanilla extract.
- Step 4: Gently fold in the thawed whipped topping until just combined. Be careful not to overmix.
- Step 5: Pour the cheesecake filling over the prepared graham cracker crust, spreading evenly.
- Step 6: Cover the springform pan with plastic wrap and refrigerate for at least 4 hours, or preferably overnight, to allow the cheesecake to set completely.
Notes
- Store leftover cheesecake in an airtight container in the refrigerator for up to 3 days.
- Since this is a no-bake cheesecake, there's no need to reheat; just enjoy it straight from the fridge!
- Garnish individual slices with fresh berries or a drizzle of chocolate sauce for an extra touch of elegance.
- For a smoother filling, ensure your cream cheese is fully softened before mixing – leave it out for at least an hour!
- Prep Time: 15 minutes
- Cook Time: 20 minutes
- Method: Stovetop
- Cuisine: American
FAQs
What makes No-Bake Cheesecake Perfects: A Sweet Symphony of Simplicity so special?
Let’s be real, sometimes the oven is just not your friend. Maybe it’s a heatwave, or maybe you’re just feeling a little…oven-averse. That’s where this no-bake cheesecake comes in! This recipe skips the baking drama and delivers a creamy, dreamy dessert with minimal effort. It’s the perfect way to satisfy your sweet tooth without turning your kitchen into a sauna. It is simplicity at its finest, using everyday ingredients that you probably already have in your pantry. Prepare yourself for a burst of flavors in every bite.
Can I customize my no-bake cheesecake with different toppings?
Absolutely! Think of the basic cheesecake as a blank canvas for your culinary creativity. Fresh berries are always a winner, offering a burst of juicy sweetness that complements the creamy filling. Chocolate shavings add a touch of decadence, while a drizzle of caramel sauce elevates the whole experience. You could even crush some gluten-free cookies on top for added texture. Feel free to experiment and create your own masterpiece. The possibilities are endless.
What kind of crust works best for this no-bake cheesecake recipe?
A classic graham cracker crust is always a good choice, providing a slightly sweet and crumbly base. However, if you’re feeling adventurous, you can try using crushed gluten-free vanilla wafers or even finely ground nuts. Just make sure to combine the crumbs with melted butter and press them firmly into the bottom of your springform pan. This will ensure that the crust holds its shape and doesn’t crumble when you slice into the cheesecake. A sturdy crust is key to the perfect no-bake slice.
How long does No-Bake Cheesecake Perfects: A Sweet Symphony of Simplicity need to chill?
Patience, young grasshopper! The chilling time is crucial for this dessert. We recommend at least six hours, but overnight is even better. This allows the cheesecake filling to fully set and develop its signature creamy texture. If you try to slice into it too soon, you’ll end up with a gooey mess, and nobody wants that. So, resist the urge to peek and let the refrigerator do its magic. Trust us, it’s worth the wait.


Leave a Comment