
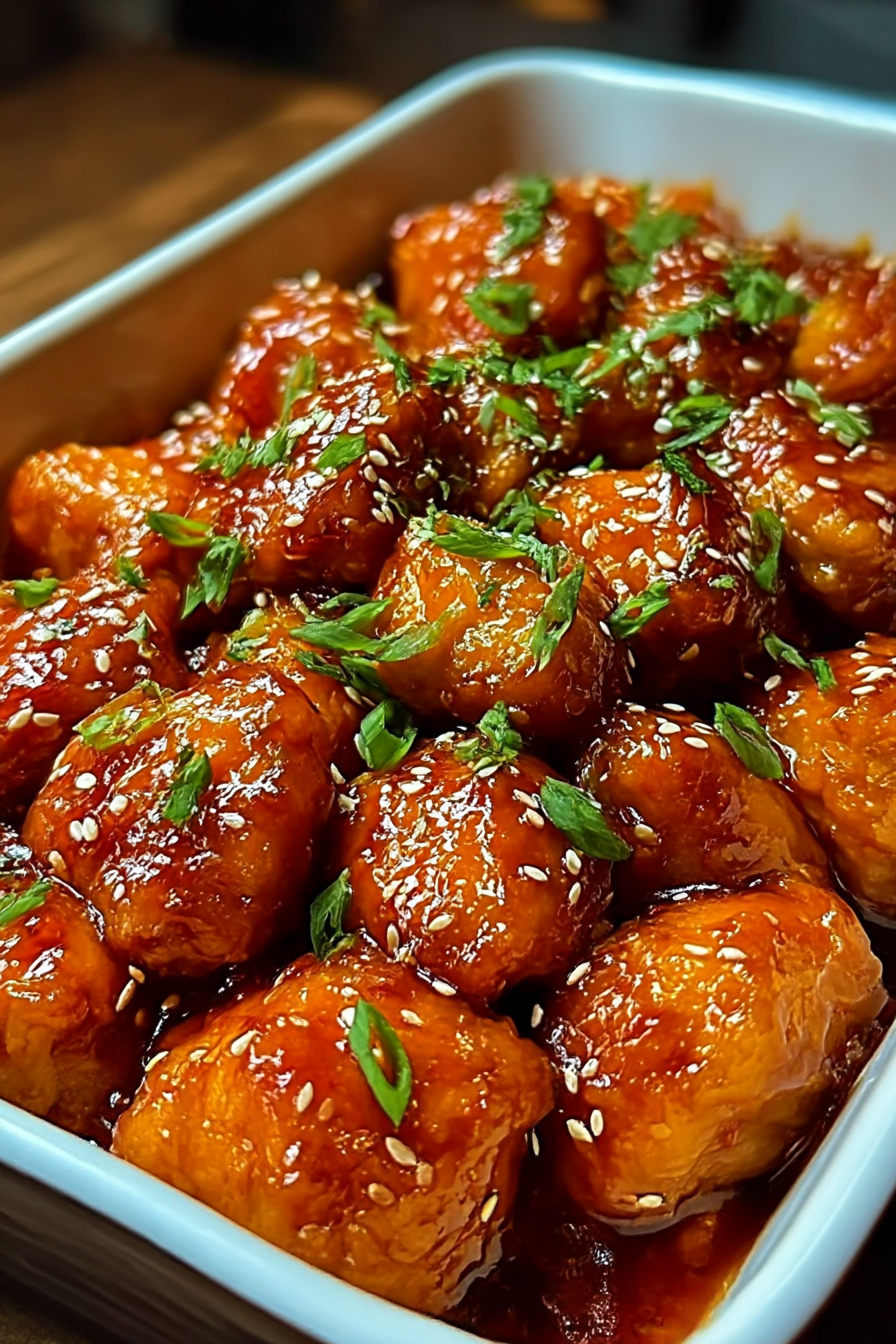
Oh, the symphony of tangy sweetness! Imagine biting into tender chicken, glazed with a vibrant sauce that dances on your tongue with every single bite. That’s precisely the magic we’re creating today with this delightful baked treat!
It’s comfort food elevated, a dish that brings smiles and a burst of flavour to any dinner table. Get ready for an easy recipe that promises an adventure in taste – it is the perfect baked sweet and sour chicken for you!
- Effortlessly combine sweet, tangy, and savory flavors in one delightful dish.
- Achieve a delightful crispy exterior with a juicy and tender chicken inside.
- Customize the sauce to your preference and easily accommodate any dietary needs.
- Enjoy a visually appealing and delicious meal suitable for both casual and special occasions.
Ingredients for Baked Sweet and Sour Chicken
Here’s what you’ll need to make this delicious dish:
The full ingredients list, including measurements, is provided in the recipe card directly below.
How to Make Baked Sweet and Sour Chicken
Follow these simple steps to prepare this delicious dish:
Step 1: Prepare the Chicken and Vegetables
Preheat your oven to 375°F (190°C). Cut the chicken into bite-sized pieces if using breasts. Chop the bell peppers and onions into similar-sized pieces. This helps ensure even cooking.
Step 2: Create the Sweet and Sour Sauce
In a medium bowl, whisk together the ketchup, apple cider vinegar, brown sugar, soy sauce, cornstarch, garlic powder, and ginger powder until well combined. Ensure no lumps of cornstarch remain for a smooth sauce.
Step 3: Combine Ingredients
In a large bowl, combine the chicken, bell peppers, onions, and pineapple chunks. Pour the sweet and sour sauce over the mixture and toss well to coat everything evenly. The sauce should cover all ingredients.
Step 4: Bake the Chicken
Transfer the mixture to a greased baking dish. Spread the ingredients in a single layer to ensure even cooking. Bake for 30-40 minutes, or until the chicken is cooked through and the sauce has thickened.
Step 5: Optional Broil for Extra Crispness
For a crispier finish, broil the dish for the last 2-3 minutes, keeping a close eye to prevent burning. Broiling adds a lovely caramelized touch to the chicken and vegetables.
Step 6: Serve and Enjoy
Garnish with sesame seeds, if desired. Serve the baked sweet and sour chicken hot over rice or noodles. This dish pairs wonderfully with a side of steamed broccoli or a fresh salad.
Perfecting the Cooking Process

Efficiency is key! I usually start by prepping all the ingredients – chopping veggies, measuring spices, and getting the chicken ready. Then, I sear the chicken to lock in those delicious juices before baking it with the tangy sweet and sour sauce. This ensures the chicken stays moist and flavorful.
Add Your Touch
Don’t be afraid to get creative. If you’re not a fan of pineapple, try using mandarin oranges or even some grapes. For a bit of heat, add a pinch of red pepper flakes to the sauce. You could also swap the chicken for turkey breast or even tofu for a vegetarian twist.
Storing & Reheating
Leftovers are your friend! Store any extra baked sweet and sour chicken in an airtight container in the fridge for up to three days. To reheat, you can microwave it, but I prefer to bake it in the oven at a low temperature until heated through. This keeps the chicken from drying out.
Here are a few golden nuggets of wisdom I’ve picked up along the way:
- For extra crispy chicken, pat it dry with paper towels before searing. This helps achieve a beautiful golden-brown crust that everyone will love.
- Don’t overcrowd the baking dish. Give the chicken pieces enough space so they bake evenly and the sauce can caramelize perfectly.
- Taste the sauce before baking and adjust the sweetness or sourness to your liking. A little extra honey or a splash of vinegar can make all the difference.
(Personal anecdote formated as paragraph subheading)
I remember the first time I made this for my family. My picky eater nephew, normally a chicken nugget devotee, actually asked for seconds! That’s when I knew this recipe was a keeper.
The Sweet and Sour Saga Begins
Alright, folks, gather ’round! Today, we’re embarking on a culinary adventure that’s guaranteed to tickle your taste buds and leave you saying, “Why haven’t I made this sooner?” We’re diving headfirst into the wonderful world of Baked Sweet and Sour Chicken. Forget those gloopy takeout versions that leave you feeling slightly regretful; we’re talking about a homemade masterpiece that’s bursting with fresh flavors, perfectly balanced tanginess, and that satisfying “I made this!” glow.
Now, I know what you might be thinking: sweet and sour chicken sounds complicated. But trust me, this recipe is easier than parallel parking a minivan in a crowded lot. We’re keeping it simple, accessible, and utterly delicious. So, ditch the takeout menus, roll up your sleeves, and let’s get cooking! You’ll be amazed at how quickly this dish comes together and how much better it tastes than anything you can order.
Ingredients: The Dream Team
Before we start wielding our spatulas like culinary superheroes, let’s gather our ingredients. Think of them as the Avengers of your kitchen, each playing a crucial role in creating this flavor explosion.
Here’s what you’ll need for this Baked Sweet and Sour Chicken masterpiece:
- **Chicken:** About 2 pounds of boneless, skinless chicken breasts, cut into bite-sized pieces. We want pieces that are easy to eat and cook evenly.
- **Pineapple Chunks:** One 20-ounce can, drained. Don’t toss that juice, though! We’ll need it later.
- **Bell Peppers:** Two, one red and one green, cut into chunks. Because variety is the spice of life, and also, it looks pretty.
- **Onion:** One medium onion, chopped. Onions are the unsung heroes of so many great dishes, and this is no exception.
- **Cornstarch:** About 1/4 cup. This is our secret weapon for thickening the sauce.
- **Soy Sauce:** 1/2 cup. Adds that umami goodness that makes everything better.
- **Apple Cider Vinegar:** 1/4 cup. For that essential tang!
- **Brown Sugar:** 1/2 cup. The sweet to balance the sour.
- **Ketchup:** 1/4 cup. Adds depth and richness to the sauce.
- **Chicken Broth:** 1/2 cup. To thin the sauce and keep things moist.
- **Garlic:** 2 cloves, minced. Because garlic makes everything better. Always.
- **Ginger:** 1 teaspoon, grated. Adds a warm, spicy note.
- **Sesame Oil:** 1 teaspoon. A little goes a long way, adding a nutty aroma.
- **Vegetable Oil:** For searing the chicken.
- **Salt and Pepper:** To taste. Because seasoning is everything.
- **Optional Garnish:** Sesame seeds and chopped green onions for that final flourish.
See? Nothing too scary. Most of these ingredients are probably already lurking in your pantry, just waiting to be unleashed.
Sauce Boss: Crafting the Perfect Tang
Now, let’s talk sauce. This is where the magic really happens. The perfect sweet and sour sauce is a delicate balance of flavors, a culinary tightrope walk between sugary bliss and tangy zing. Luckily, we’ve got a recipe that nails it every time.
1. **Whisk It Up: ** In a medium bowl, whisk together the soy sauce, apple cider vinegar, brown sugar, ketchup, chicken broth, pineapple juice (remember that can we drained?), minced garlic, grated ginger, and sesame oil. This is your sweet and sour potion, so make sure it’s well combined.
2. **Cornstarch Power: ** In a separate small bowl, whisk together the cornstarch with 2 tablespoons of cold water until smooth. This will prevent any clumps from forming when we add it to the sauce.
3. **The Grand Finale: ** Pour the cornstarch slurry into the sauce mixture and whisk again until everything is nicely combined. Set aside for now.
That’s it! Your sauce is ready to roll. You can even give it a little taste test (go ahead, I won’t judge) and adjust the sweetness or sourness to your liking. Remember, this is *your* kitchen, *your* flavor adventure.
Chicken Prep: From Bland to Grand
Alright, chicken time! We want our chicken to be flavorful and juicy, not dry and rubbery. Follow these simple steps, and you’ll be golden.
1. **Seasoning is Key: ** In a large bowl, toss the chicken pieces with salt and pepper. Don’t be shy! Seasoning is what separates a good dish from a great dish.
2. **Searing for Success: ** Heat a tablespoon of vegetable oil in a large skillet or wok over medium-high heat. Once the oil is shimmering, add the chicken in a single layer (you might need to do this in batches) and sear for about 2-3 minutes per side, until lightly browned. We’re not trying to cook the chicken all the way through here; we just want to get a nice sear on the outside.
3. **Veggie Power: ** Add the chopped onion and bell peppers to the skillet and cook for another 3-5 minutes, until they’re slightly softened.
Baking Bliss: The Home Stretch
We’re almost there, folks! Now comes the easiest part: baking.
1. **Assemble the Troops: ** Preheat your oven to 375°F (190°C). Grease a 9×13 inch baking dish.
2. **Layer It Up: ** Arrange the seared chicken and veggies in the prepared baking dish. Scatter the pineapple chunks evenly over the top.
3. **Sauce It Up: ** Pour the sweet and sour sauce over the chicken, veggies, and pineapple, making sure everything is evenly coated.
4. **Bake It ‘Til You Make It: ** Bake for 25-30 minutes, or until the chicken is cooked through and the sauce has thickened and is bubbly.
The Grand Reveal: Serving Suggestions
Congratulations! You’ve officially conquered the Baked Sweet and Sour Chicken challenge. Now, it’s time to reap the rewards of your culinary efforts.
- **Rice, Rice Baby:** Serve your Baked Sweet and Sour Chicken over a bed of fluffy white rice or brown rice. The rice soaks up all that delicious sauce, making every bite a symphony of flavors.
- **Noodle Nirvana:** For a different twist, try serving it with egg noodles or even ramen noodles.
- **Veggie Boost:** Add a side of steamed broccoli, green beans, or asparagus for a healthy and colorful meal.
- **Garnish Glory:** Sprinkle with sesame seeds and chopped green onions for that final touch of elegance.
This Baked Sweet and Sour Chicken is perfect for a weeknight dinner, a potluck, or even a fancy dinner party. It’s a crowd-pleaser that’s sure to impress.
Frequently Asked Questions (Because I Know You Have Them)
- **Can I use frozen chicken?** Absolutely! Just make sure to thaw it completely before cooking.
- **Can I make this ahead of time?** Yes! You can assemble the dish ahead of time and store it in the fridge for up to 24 hours before baking. You might need to add a few extra minutes to the baking time.
- **Can I freeze leftovers?** Sure thing! Store the cooled leftovers in an airtight container in the freezer for up to 2 months. Thaw overnight in the fridge before reheating.
- **What if I don’t have apple cider vinegar?** You can substitute it with white vinegar or rice vinegar.
- **Can I add other vegetables?** Of course! Feel free to add your favorite veggies, such as carrots, snap peas, or water chestnuts.
Variations: Spice It Up!
Feeling adventurous? Here are a few variations to take your Baked Sweet and Sour Chicken to the next level.
- **Spicy Sensation:** Add a pinch of red pepper flakes or a drizzle of chili garlic sauce to the sauce for a fiery kick.
- **Tropical Twist:** Add mango chunks or papaya to the dish for an extra dose of tropical flavor.
- **Honey Garlic Goodness:** Substitute the brown sugar with honey for a slightly different flavor profile.
- **Lemon Zest Zing:** Add the zest of one lemon to the sauce for a bright and citrusy flavor.
The possibilities are endless! Don’t be afraid to experiment and create your own signature version of this classic dish. This versatile recipe makes a fantastic lunch or dinner, and the leftover chicken tastes just as amazing.
Baked Sweet and Sour Chicken: A Culinary Triumph
So, there you have it: a complete guide to making the best Baked Sweet and Sour Chicken you’ve ever tasted. It’s easy, delicious, and guaranteed to impress. Now go forth and conquer your kitchen! Your taste buds (and your family) will thank you. Happy cooking!
Conclusion for Baked Sweet and Sour Chicken :
This Baked Sweet and Sour Chicken offers a healthier, equally delicious alternative to the traditional fried version. By baking instead of frying, we achieve a crispy coating without the excess oil. The homemade sauce, customizable to your taste, brings the perfect balance of sweet and tangy flavors. Feel free to adapt the recipe with your favorite vegetables. This dish is easy to prepare, family-friendly, and a fantastic way to enjoy a classic meal with a lighter twist. So, go ahead and give it a try – you might just find your new favorite weeknight dinner!
Print
Baked Sweet and Sour Chicken
Delicious baked sweet and sour chicken recipe with detailed instructions and nutritional information.
- Total Time: 35 minutes
- Yield: 4 servings
Ingredients
- Boneless, skinless chicken breasts: 1.5 lbs, cut into 1-inch cubes
- Cornstarch: 1/2 cup
- All-purpose flour: 1/4 cup
- Vegetable oil: 2 tablespoons
- Pineapple chunks: 1 (20 ounce) can, drained
- Green bell pepper: 1, cut into 1-inch pieces
- Sweet and Sour Sauce: 1 (12 ounce) bottle
- Soy sauce: 2 tablespoons
Instructions
- Step 1: Preheat oven to 375 degrees F (190 degrees C). Lightly grease a 9×13 inch baking dish.
- Step 2: In a large bowl, combine cornstarch and flour. Toss the chicken pieces in the mixture until well coated.
- Step 3: Heat vegetable oil in a large skillet over medium-high heat. Add the chicken and cook until browned on all sides. It doesn't need to be cooked through.
- Step 4: In the greased baking dish, arrange the browned chicken, pineapple chunks, and green bell pepper.
- Step 5: In a separate bowl, combine the sweet and sour sauce and soy sauce. Pour the sauce mixture over the chicken and vegetables in the baking dish.
- Step 6: Bake in the preheated oven for 30-40 minutes, or until the chicken is cooked through and the sauce has thickened slightly. Serve hot with rice.
Notes
- Store leftovers in an airtight container in the refrigerator for up to 3 days.
- For best results, reheat in the oven at 350°F until warmed through, preventing the chicken from becoming rubbery.
- Serve this delightful dish over a bed of fluffy white rice to soak up all that delicious sauce.
- Don't overcrowd the skillet when browning the chicken; work in batches to ensure even browning and prevent steaming.
- Prep Time: 15 minutes
- Cook Time: 20 minutes
- Method: Stovetop
- Cuisine: American
FAQs :
Can I use different vegetables for my Baked Sweet and Sour Chicken?
Absolutely! This recipe is more of a guideline than a rigid set of rules. Feel free to swap out the bell peppers for broccoli florets, add some snap peas for extra crunch, or even toss in some sliced carrots. The beauty of sweet and sour chicken lies in its adaptability. Consider mushrooms for a heartier touch or pineapple chunks for an extra burst of tropical sweetness. Don’t be afraid to experiment and create your own signature version based on what you have on hand or what your taste buds crave. Get creative and have fun!
What’s the best way to reheat leftover sweet and sour chicken?
Reheating this dish is simple! For the best results, I suggest using an oven. Spread the chicken and sauce on a baking sheet and bake at 350°F (175°C) until heated through. This helps maintain crispiness. If you’re short on time, a microwave works too, but be aware the chicken may soften a bit. Add a splash of chicken broth to the chicken before heating to maintain moisture. Avoid overheating; we want tender, flavorful chicken, not tough and dry leftovers! Enjoy every last bite!
How can I make the sauce for this chicken dish even sweeter or more sour?
Adjusting the sweet and sour balance is easy! For a sweeter sauce, add a tablespoon of honey or maple syrup. If you prefer a more tart flavor, a splash of apple cider vinegar or lemon juice will do the trick. Start with small increments and taste as you go. Everyone’s palate is different, so customize it to your liking. A little brown sugar can also add depth and caramel notes. The goal is a harmonious blend of sweet and sour that makes your taste buds sing!
What can I serve with Baked Sweet and Sour Chicken?
There are many options for serving this chicken dish! Fluffy white rice is a classic choice, perfectly soaking up the flavorful sauce. For a healthier alternative, try quinoa or brown rice. Noodles are also a great pairing, especially egg noodles or even zucchini noodles for a low-carb option. Don’t forget the veggies! A side of steamed broccoli, asparagus, or a simple green salad adds freshness and balance to the meal. Consider a sprinkle of sesame seeds and chopped green onions for added visual appeal and flavor.


Leave a Comment