

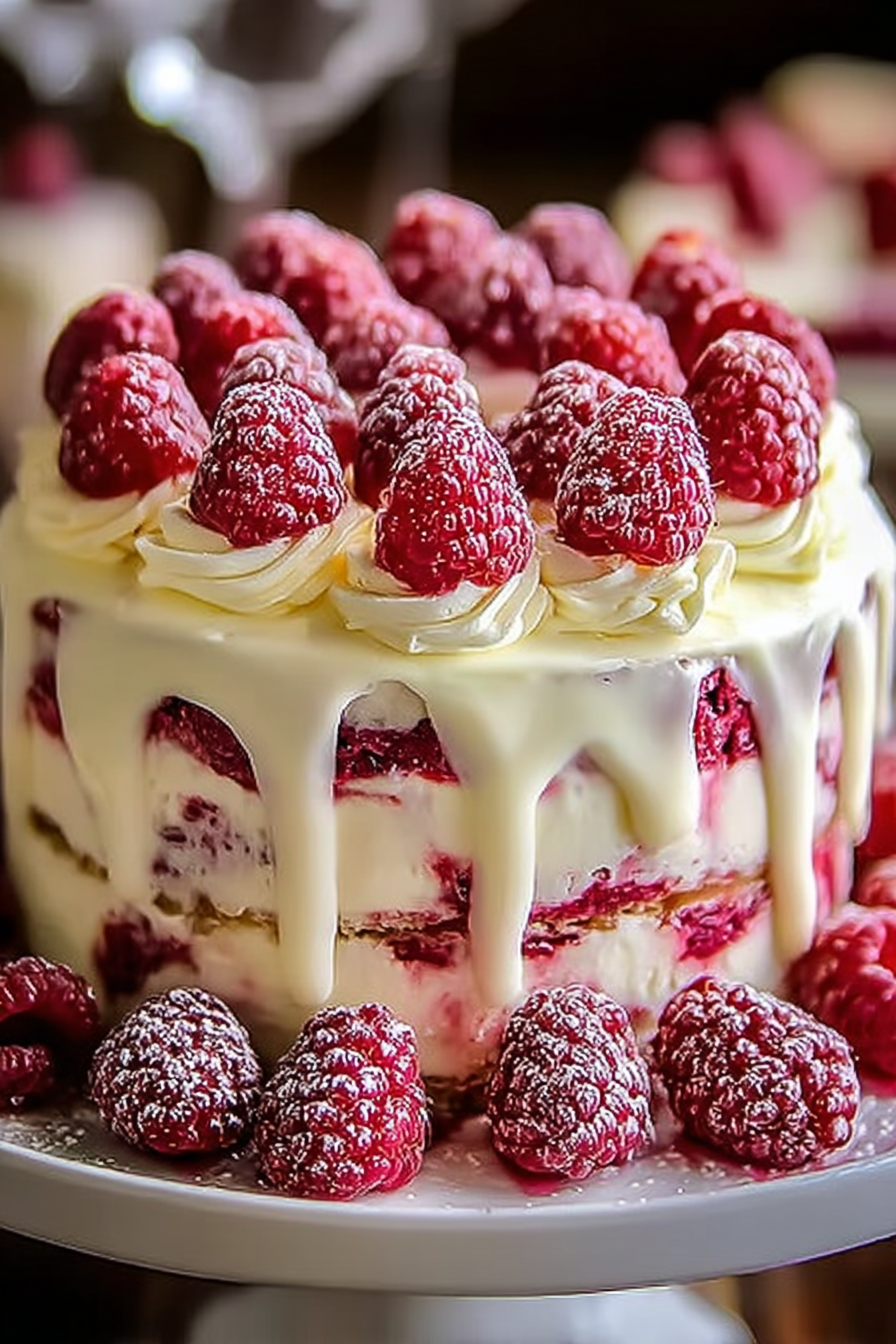
Imagine sinking your fork into a slice of **White Chocolate Raspberry Dream Cake: A Heavenly Dessert**, where creamy white chocolate meets the tangy burst of fresh raspberries. It’s a taste sensation that dances on your tongue, leaving you utterly speechless.
This isn’t just a cake; it’s a memory waiting to happen. Picture this: sunshine streaming through the window, laughter bubbling in the air, and this magnificent cake gracing the table. Perfect for birthdays, celebrations, or simply turning an ordinary day into something extraordinary, this cake promises pure bliss with every bite.
Here are just a few reasons why this **White Chocolate Raspberry Dream Cake: A Heavenly Dessert** will become your new favorite:
- Effortless elegance: Impress your guests with a show-stopping dessert that’s surprisingly easy to make, even for beginner bakers.
- A symphony of flavors: Experience the delightful combination of rich white chocolate and the refreshing tartness of juicy raspberries in every layer.
- Visually stunning: Its beautiful layers, vibrant colors, and elegant decoration make it a feast for the eyes as well as the palate.
- Versatile indulgence: Perfect for any occasion, from casual gatherings to elegant dinner parties, a guaranteed crowd-pleaser.
Ingredients for White Chocolate Raspberry Dream Cake: A Heavenly Dessert
Here’s what you’ll need to make this delicious dish:
The full ingredients list, including measurements, is provided in the recipe card directly below.
How to Make White Chocolate Raspberry Dream Cake: A Heavenly Dessert
Follow these simple steps to prepare this delicious dish:
Step 1: Prepare the Cake Batter
Preheat oven to 350°F (175°C). Grease and flour two 9-inch round cake pans. In a large bowl, whisk together the flour, sugar, baking powder, and salt.
Step 2: Cream Butter and Add Wet Ingredients
In a separate bowl, cream together the softened butter and sugar until light and fluffy. Beat in the eggs one at a time, then stir in the Alcohol-free vanilla extract.
Step 3: Combine Wet and Dry Ingredients
Gradually add the dry ingredients to the wet ingredients, alternating with the milk, beginning and ending with the dry ingredients. Mix until just combined. Gently fold in the white chocolate chips and fresh raspberries.
Step 4: Bake the Cakes
Divide the batter evenly between the prepared cake pans. Bake for 30-35 minutes, or until a wooden skewer inserted into the center comes out clean. Let the cakes cool in the pans for 10 minutes before inverting them onto a wire rack to cool completely.
Step 5: Make the White Chocolate Ganache
While the cakes are cooling, prepare the white chocolate ganache. In a heatproof bowl set over a saucepan of simmering water (or in the microwave in 30-second intervals), melt the white chocolate chips and heavy cream together, stirring until smooth. Let the ganache cool slightly, until it thickens to a spreadable consistency.
Step 6: Assemble and Frost the Cake
Once the cakes are completely cool, level them if necessary. Place one cake layer on a serving plate and spread with a generous layer of the white chocolate ganache. Top with the second cake layer and frost the entire cake with the remaining ganache. Garnish with fresh raspberries and a dusting of powdered sugar, if desired. Slice and serve this **White Chocolate Raspberry Dream Cake: A Heavenly Dessert** for a truly divine treat.
Perfecting the Cooking Process
Efficiency is key! Start by preparing all your ingredients. Cream the butter and sugar while the oven preheats. Mix dry and wet ingredients separately, then gently combine. This ensures an even bake and a dreamy texture for your white chocolate raspberry creation.
Add Your Touch
Want to personalize your dessert? Consider using different berries like blueberries or strawberries for a twist. Add a hint of lemon zest to the batter for extra zing. You can also swirl in a raspberry sauce on top before baking for a marbled effect.
Storing & Reheating
To keep your cake fresh, store it in an airtight container in the refrigerator. It will last for up to four days. To reheat, let it sit at room temperature for about 30 minutes, or warm individual slices in the microwave for a few seconds.
Here are some helpful tips to elevate your baking game:
- Always use room-temperature ingredients. This helps everything blend smoothly and creates a better cake batter.
- Don’t overmix the batter once you add the dry ingredients. Overmixing develops gluten, which can result in a tough cake.
- Let the cake cool completely before frosting. This prevents the frosting from melting and creates a neater finish.
(Personal anecdote formated as paragraph subheading)
My friend Sarah once declared this cake “better than therapy.” Knowing my baking could bring such joy truly made all the whisking and folding worthwhile. This cake is more than a dessert; it’s a smile in every slice.
Ah, the *White Chocolate Raspberry Dream Cake: A Heavenly Dessert*. Just the name conjures images of fluffy clouds, sun-ripened raspberries, and enough sweetness to send your taste buds on a first-class trip to paradise. Forget your troubles, folks, because we’re about to embark on a baking adventure that will transform your kitchen into a wonderland of sugary delight. Now, I know what you’re thinking: “Another cake recipe? Yawn.” But trust me, this isn’t your grandma’s dry, crumbly cake. This is a *White Chocolate Raspberry Dream Cake: A Heavenly Dessert* – a symphony of flavors and textures designed to make you question everything you thought you knew about dessert. It’s a *dream cake* indeed.
Why This Cake Will Rock Your World
Let’s be honest, the world needs more joy. And what better way to spread joy than with a *White Chocolate Raspberry Dream Cake: A Heavenly Dessert*? This cake isn’t just delicious; it’s an experience. The creamy white chocolate perfectly complements the tart raspberries, creating a balance that will leave you craving more. And the texture? Oh, the texture! It’s light, airy, and melt-in-your-mouth amazing. We’re talking cloud-like perfection here, people. You may even start dreaming of *White Chocolate Raspberry Dream Cake: A Heavenly Dessert*.
But wait, there’s more! This cake is surprisingly easy to make. No fancy equipment or culinary degrees required. If you can whisk and fold, you can make this cake. So, put on your apron, crank up the music, and let’s get baking! This heavenly dessert is calling our names.
The Ingredients
: Your Arsenal of Deliciousness
Before we dive into the baking process, let’s gather our ingredients. Think of this as assembling your team for the ultimate dessert showdown. Here’s what you’ll need:
- **All-Purpose Flour:** The foundation of our cake. Makes sure that you use fresh flour for the best results.
- **Granulated Sugar:** For sweetness and a touch of magic.
- **Baking Powder:** The secret ingredient that gives our cake its lift.
- **Salt:** A pinch to balance the sweetness.
- **Unsalted Butter:** Adds richness and flavor. Make sure it is softened!
- **Eggs:** Binds everything together.
- **Alcohol-free vanilla extract:** A touch of warmth and aroma.
- **Buttermilk:** Keeps the cake moist and tender.
- **White Chocolate Chips:** The star of the show!
- **Fresh Raspberries:** The tangy counterpoint to the sweetness.
- **Heavy Cream:** For a luscious frosting.
- **Powdered Sugar:** To sweeten the frosting.
- **Plant-Based Gelling Agent (Agar-Agar):** To stabilize the frosting.
Okay, now that we have our ingredients, let’s get ready to bake!
Step-by-Step
: Creating Your Masterpiece
Alright, bakers, it’s time to roll up our sleeves and get our hands dirty. Follow these steps carefully, and you’ll be enjoying a slice of *White Chocolate Raspberry Dream Cake: A Heavenly Dessert* in no time.
**Step 1: Preheat and Prep**
Preheat your oven to 350°F (175°C). Grease and flour a 9-inch round cake pan. This prevents the cake from sticking and ensures easy removal. Nobody wants a cake casualty.
**Step 2: Cream the Butter and Sugar**
In a large bowl, cream together the softened butter and granulated sugar until light and fluffy. This usually takes about 3-5 minutes. You’re looking for a pale yellow color and a smooth texture.
**Step 3: Add the Eggs and Vanilla**
Beat in the eggs one at a time, then stir in the Alcohol-free vanilla extract. Make sure each egg is fully incorporated before adding the next.
**Step 4: Combine Dry Ingredients**
In a separate bowl, whisk together the flour, baking powder, and salt. This ensures that the baking powder is evenly distributed throughout the flour.
**Step 5: Alternate Wet and Dry Ingredients**
Gradually add the dry ingredients to the wet ingredients, alternating with the buttermilk. Begin and end with the dry ingredients. Mix until just combined. Be careful not to overmix!
**Step 6: Fold in the White Chocolate and Raspberries**
Gently fold in the white chocolate chips and fresh raspberries. Be gentle! You don’t want to crush the raspberries.
**Step 7: Bake**
Pour the batter into the prepared cake pan and bake for 30-35 minutes, or until a wooden skewer inserted into the center comes out clean.
**Step 8: Cool**
Let the cake cool in the pan for 10 minutes before inverting it onto a wire rack to cool completely.
Frosting
: The Crowning Glory
No *White Chocolate Raspberry Dream Cake: A Heavenly Dessert* is complete without a decadent frosting. This white chocolate cream cheese frosting is the perfect complement to the cake’s delicate flavors.
**Ingredients: **
- 8 ounces cream cheese, softened
- 1 cup (2 sticks) unsalted butter, softened
- 4 cups powdered sugar
- 1 teaspoon Alcohol-free vanilla extract
- 4 ounces white chocolate, melted and cooled
- 1 teaspoon Plant-Based Gelling Agent (Agar-Agar)
**Instructions: **
1. In a large bowl, beat the cream cheese and butter until smooth and creamy.
2. Gradually add the powdered sugar, one cup at a time, beating until smooth.
3. Stir in the Alcohol-free vanilla extract and melted white chocolate.
4. Add Plant-Based Gelling Agent (Agar-Agar)
5. Beat until light and fluffy.
Assembling Your Dream Cake
Once the cake is completely cool, it’s time to frost it!
1. Place one cake layer on a serving plate.
2. Spread a generous layer of frosting over the top.
3. Top with the second cake layer.
4. Frost the top and sides of the cake with the remaining frosting.
5. Garnish with fresh raspberries and white chocolate shavings, if desired.
Variations
: Remix Your Recipe
The beauty of baking is that you can always put your own spin on a recipe. Here are a few ideas to get your creative juices flowing:
- **Lemon Raspberry Dream Cake:** Add lemon zest to the cake batter and frosting for a bright, citrusy flavor.
- **Chocolate Raspberry Dream Cake:** Use chocolate cake mix instead of white cake mix and add cocoa powder to the frosting.
- **Mini Raspberry Dream Cakes:** Bake the cake in muffin tins for individual treats.
Troubleshooting
: Baking Blunders Be Gone
Even the best bakers have their off days. Here are a few common baking problems and how to fix them:
- **Cake is dry:** Make sure you’re using enough liquid in the batter and don’t overbake the cake.
- **Cake is too dense:** Don’t overmix the batter and make sure your baking powder is fresh.
- **Frosting is too thin:** Add more powdered sugar until you reach the desired consistency.
Enjoying Your Heavenly Creation
Congratulations, you’ve made a *White Chocolate Raspberry Dream Cake: A Heavenly Dessert*! Now it’s time to sit back, relax, and enjoy the fruits of your labor. Serve it with a scoop of vanilla ice cream or a dollop of whipped cream for the ultimate indulgence. And don’t forget to share with friends and family – because everything is better when shared. This cake is more than a dessert; it’s an experience, a memory, and a whole lot of happiness. So go ahead, take a bite and let your dreams take flight. After all, you deserve it! The subtle tanginess of the raspberries with the sweetness of white chocolate creates a symphony in every bite.
Conclusion for White Chocolate Raspberry Dream Cake: A Heavenly Dessert
This White Chocolate Raspberry Dream Cake: A Heavenly Dessert is truly a showstopper. It combines the sweetness of white chocolate with the tartness of raspberries, all nestled within a delicate, fluffy cake. It’s the ideal dessert for celebrations or when you simply need a pick-me-up. Don’t be afraid to experiment with different berries and frosting techniques to make this dream cake your own personal masterpiece. So go forth, bake, and prepare to be transported to a world of pure dessert bliss!
Print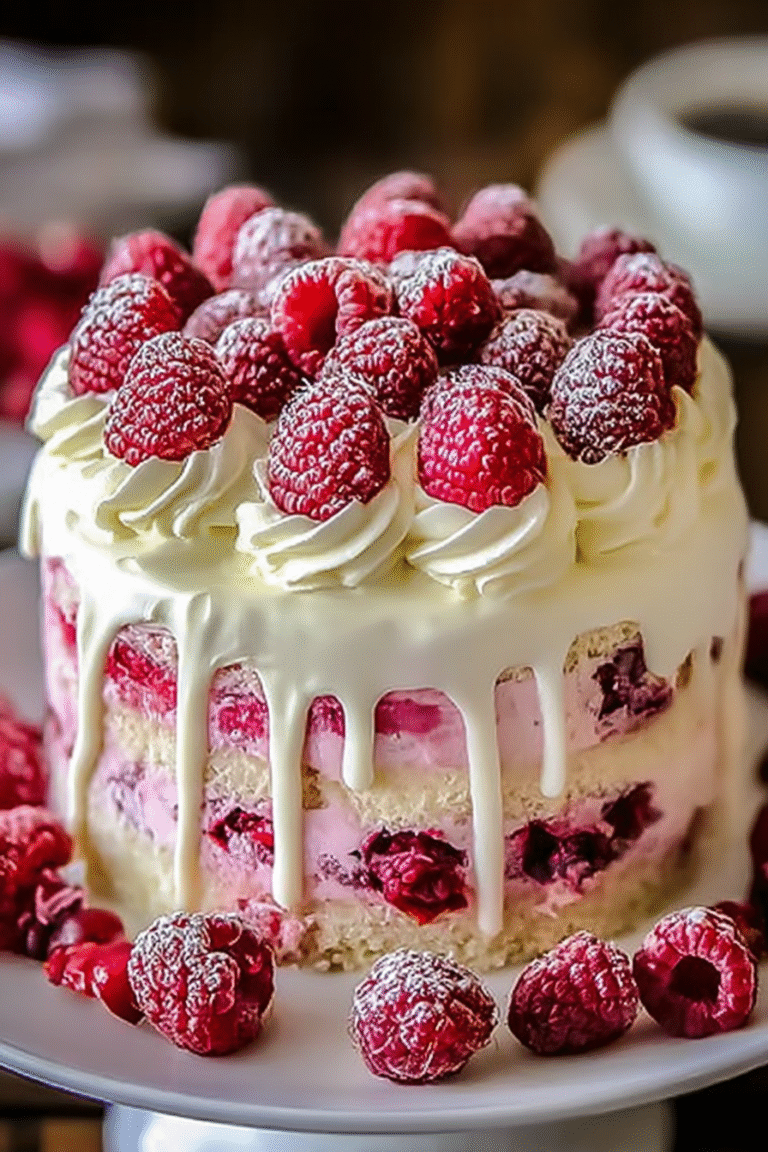
White Chocolate Raspberry Dream Cake: A Heavenly Dessert
Delicious white chocolate raspberry dream cake: a heavenly dessert recipe with detailed instructions and nutritional information.
- Total Time: 35 minutes
- Yield: 4 servings
Ingredients
- All-purpose flour: 2 1/2 cups
- Granulated sugar: 1 3/4 cups
- Baking powder: 2 1/2 teaspoons
- Salt: 1/2 teaspoon
- Unsalted butter, softened: 1 cup (2 sticks)
- Eggs: 3 large
- Milk: 1 cup
- White chocolate chips, melted: 8 ounces
Instructions
- Step 1: Preheat oven to 350°F (175°C). Grease and flour a 9×13 inch baking pan.
- Step 2: In a large bowl, whisk together the flour, sugar, baking powder, and salt.
- Step 3: Add the softened butter, eggs, and milk to the dry ingredients. Beat with an electric mixer on medium speed for 2 minutes, or until smooth.
- Step 4: Gently fold in the melted white chocolate chips and fresh raspberries.
- Step 5: Pour the batter into the prepared pan and spread evenly.
- Step 6: Bake for 30-35 minutes, or until a wooden skewer inserted into the center comes out clean. Let cool completely before frosting (optional).
Notes
- Store leftover cake tightly covered in the refrigerator to keep it fresh and moist.
- A brief, gentle warming in the microwave will enhance the melted white chocolate flavor.
- Serve chilled or at room temperature with a dollop of whipped cream and extra raspberries for an elegant touch.
- To prevent raspberries from sinking, lightly toss them in flour before folding them into the batter.
- Prep Time: 15 minutes
- Cook Time: 20 minutes
- Method: Stovetop
- Cuisine: American
FAQs
What makes this White Chocolate Raspberry Dream Cake: A Heavenly Dessert so dreamy?
Oh, honey, “dreamy” doesn’t even begin to cover it! It’s the perfect storm of creamy white chocolate, tart raspberries, and a light, fluffy cake base that will make your taste buds sing. We’re talking a symphony of flavors and textures, a dessert experience so good, it might just inspire you to write poetry…or at least do the dishes without complaining. The contrast between the sweetness of the white chocolate and the tartness of the raspberries creates a balanced and delightful flavor profile.
Can I substitute other berries for raspberries in this White Chocolate Raspberry Dream Cake recipe?
Absolutely! While raspberries bring a certain *je ne sais quoi* to the party, blueberries, strawberries, or even blackberries would be delightful understudies. Just remember, each berry has its own unique flavor profile, so adjust the sweetness of the recipe accordingly. If you’re using a sweeter berry like strawberries, you might want to slightly reduce the sugar in the cake batter or frosting. Experiment and find your perfect berry bliss! This flexibility is one of the great things about this heavenly dessert.
How do I prevent my White Chocolate Raspberry Dream Cake from becoming soggy?
Sogginess is the enemy of deliciousness! To avoid a soggy situation, make sure your cake layers are completely cool before frosting. Also, be mindful of the moisture content of your raspberries. If they seem particularly juicy, you can gently pat them dry with a paper towel before adding them to the frosting or layering them between the cake. A light crumb coat of frosting before the main frosting layer can also help seal the cake and prevent moisture migration.
What are some tips for achieving the perfect White Chocolate Raspberry Dream Cake frosting consistency?
Ah, the frosting! This is where the magic happens. For a smooth, spreadable frosting, make sure your butter is at room temperature before you start. Don’t over-mix the frosting, as this can introduce too much air and make it unstable. If your frosting seems too thick, add a tablespoon of milk or cream at a time until you reach your desired consistency. If it’s too thin, add a little powdered sugar, a tablespoon at a time. Remember, patience is key!


Leave a Comment