
Imagine biting into a tiny sphere of pure delight, a symphony of chocolate and cream that melts in your mouth. These Oreo Balls aren’t just a treat; they’re a bite-sized celebration, perfect for any occasion or just because you deserve a little joy.
Think back to childhood, when a single Oreo was the ultimate indulgence. These Oreo Balls take that classic cookie and elevate it to a whole new level of decadence. Get ready for a simple recipe that delivers maximum flavor and fun, making it an instant favorite for everyone.
Here’s why you’ll absolutely adore these Oreo Balls:
Ease of preparation: This recipe is incredibly simple and requires no baking, making it a perfect treat for any skill level.
Flavor profile: The combination of crushed Oreos and cream cheese creates a rich, sweet, and utterly irresistible flavor.
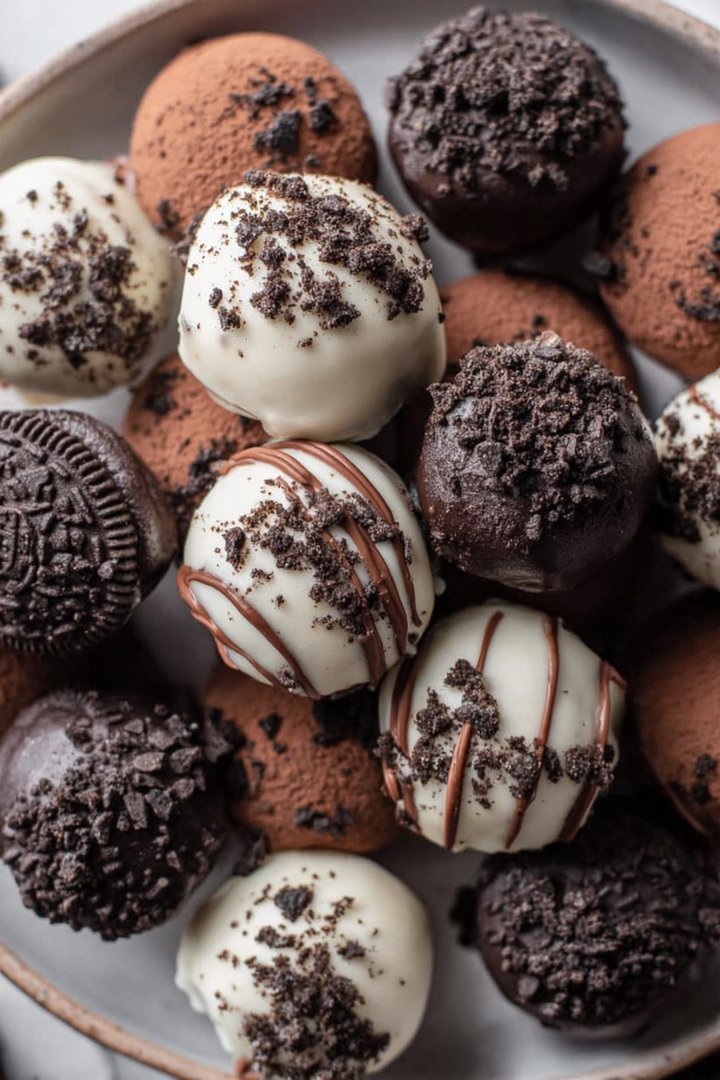
Visual appeal: These little balls of chocolatey goodness look as good as they taste, perfect for impressing guests.
Versatility: Oreo Balls are great for parties, potlucks, or a simple dessert to satisfy your sweet tooth anytime.
Ingredients for Oreo Balls
Here’s what you’ll need to make this delicious dish:
The full ingredients list, including measurements, is provided in the recipe card directly below.
How to Make Oreo Balls
Follow these simple steps to prepare this delicious dish:
Step 1: Crush the Oreos
Place the Oreo cookies into a food processor and pulse until they are finely crushed. If you don’t have a food processor, you can place them in a resealable bag and crush them with a rolling pin.
Step 2: Combine the Ingredients
In a large bowl, combine the crushed Oreos and softened cream cheese. Mix well until a smooth, dough-like consistency is formed. Ensure there are no large lumps of cream cheese remaining.
Step 3: Roll into Balls
Using your hands or a small cookie scoop, roll the mixture into 1-inch balls. Place the Oreo balls on a baking sheet lined with parchment paper.
Step 4: Chill the Balls
Place the baking sheet in the freezer for at least 30 minutes to allow the Oreo balls to firm up. This will make them easier to coat in chocolate.
Step 5: Melt the Chocolate
In a microwave-safe bowl, combine the chocolate chips and vegetable shortening. Microwave in 30-second intervals, stirring in between, until the chocolate is completely melted and smooth. Be careful not to overheat the chocolate.
Step 6: Coat the Oreo Balls
Remove the Oreo balls from the freezer. Dip each ball into the melted chocolate, ensuring it is fully coated. Use a fork or dipping tools to remove the balls from the chocolate and place them back on the parchment-lined baking sheet.
Step 7: Decorate and Set
Immediately sprinkle the coated Oreo balls with your favorite sprinkles. Allow the chocolate to set completely, either at room temperature or in the refrigerator for a quicker set.
Transfer to a serving platter and enjoy these decadent Oreo Balls with friends and family!
Perfecting the Cooking Process
To achieve the best results, start by crushing the Oreos completely. Then, mix them thoroughly with cream cheese until you form a smooth, consistent dough. Refrigerate before dipping in melted chocolate for the perfect Oreo Balls.
Add Your Touch
Feel free to get creative! Try using different flavors of Oreos, like golden or mint. For a twist, roll the balls in crushed nuts, sprinkles, or even cocoa powder for an extra layer of deliciousness to your amazing Oreo Balls.
Storing & Reheating
Store your delightful Oreo Balls in an airtight container in the refrigerator for up to a week. No reheating is necessary—they’re best enjoyed cold, straight from the fridge! The cool treat is always a crowd pleaser.
Here are some tips to help you craft the perfect Oreo Ball:
- Make sure the cream cheese is fully softened so it will incorporate evenly with the crushed Oreos, creating a smooth, consistent mixture.
- Chill the Oreo mixture thoroughly before rolling—this will prevent the balls from sticking to your hands and help them hold their shape better.
- Melt the chocolate slowly and gently to avoid burning, stirring frequently to ensure a smooth, even coating for your Oreo Balls.
(Personal anecdote formated as paragraph subheading)
I remember the first time I made these for a party; everyone devoured them in minutes! My friends were practically fighting over the last one, which is always a good sign!
The Irresistible Allure of Oreo Balls
Okay, let’s talk about something serious. No, not world peace (although that’s important too). We’re talking about the absolute, undeniable, earth-shattering deliciousness of Oreo Balls. These little spheres of joy are basically the snack equivalent of a hug from your grandma – comforting, familiar, and guaranteed to make you smile. Forget those fancy desserts that require a chemistry degree to make. These are simple, fun, and utterly addictive.
Why are these treats so amazing? It’s the perfect marriage of textures and flavors. The crunchy, chocolatey goodness of Oreos blended with the creamy, tangy embrace of cream cheese. Then, BAM! A decadent chocolate coating to seal the deal. It’s like a party in your mouth, and everyone’s invited.
And the best part? They’re ridiculously easy to make. If you can crush cookies and stir ingredients together, you’re basically a master chef in the making. Seriously, even I can’t mess these up, and that’s saying something. My culinary skills usually involve setting off the smoke alarm and ordering takeout.
So, if you’re looking for a guaranteed crowd-pleaser that requires minimal effort, look no further. Oreo Balls are your new best friend. Prepare to be the hero of every party, the star of every potluck, and the envy of every snack-loving human being.
Gathering Your Arsenal: Ingredients for Oreo Bliss
Before we dive into the nitty-gritty of creating these delightful bites, let’s make sure we have all our weapons…err, ingredients…ready. This is a crucial step, people! Don’t be caught halfway through with no cream cheese. That’s a tragedy no one wants to experience.
Here’s what you’ll need to assemble your Oreo Ball dream team:
- **Oreos:** Obviously. The star of the show. I prefer the classic, but feel free to experiment with other flavors. Peanut butter? Mint? Birthday cake? The possibilities are endless! Just make sure you have enough to crush into oblivion. About 36 Oreos should do the trick.
- **Cream Cheese:** This is the glue that holds our little balls of happiness together. Make sure it’s softened to room temperature. Trust me, trying to mix cold cream cheese with crushed Oreos is like wrestling a polar bear. Not fun. Eight ounces is the magic number.
- **Chocolate:** For the coating, of course! Milk chocolate, dark chocolate, white chocolate—the choice is yours. I personally love using semi-sweet chocolate chips for a balanced sweetness. About 12 ounces should be enough to coat your creations.
- **Optional Decorations:** This is where you can let your creativity shine. Sprinkles, crushed nuts, shredded coconut, sea salt… go wild! It’s like decorating a tiny edible Winter holiday tree.
Once you’ve gathered your ingredients, take a deep breath and prepare for some serious fun. This is the beginning of a beautiful, delicious journey.
From Crumbles to Creations: Making Your Oreo Balls
Alright, let’s get down to business! Now that you’ve assembled your ingredients, it’s time to transform them into those irresistible Oreo Balls we’ve been dreaming about. Don’t worry, it’s easier than parallel parking.
1. **Crush the Oreos: ** This is where you can unleash your inner rage (just kidding…mostly). The easiest way is to throw them into a food processor and pulse until they’re reduced to fine crumbs. If you don’t have a food processor, you can put them in a large ziplock bag and whack them with a rolling pin. It’s surprisingly therapeutic.
2. **Mix in the Cream Cheese: ** In a large bowl, combine the crushed Oreos and softened cream cheese. Mix until everything is well combined and you have a smooth, slightly sticky mixture. You might need to use your hands for this part. Embrace the mess!
3. **Chill Out: ** Cover the bowl and refrigerate the mixture for at least 30 minutes. This is important! Chilling the dough makes it easier to roll into balls and prevents them from melting when you dip them in chocolate. Patience is a virtue, my friends.
4. **Roll into Balls: ** Scoop out about a tablespoon of the mixture and roll it into a ball between your palms. Place the balls on a baking sheet lined with parchment paper. This prevents them from sticking and makes cleanup a breeze.
5. **Melt the Chocolate: ** In a double boiler or microwave-safe bowl, melt the chocolate until smooth. If using the microwave, heat in 30-second intervals, stirring in between, to prevent burning. Burnt chocolate is the enemy of good desserts.
6. **Dip and Decorate: ** Dip each Oreo Ball into the melted chocolate, making sure it’s completely coated. You can use a fork or dipping tools for this. Place the dipped balls back on the parchment-lined baking sheet and immediately sprinkle with your favorite decorations.
7. **Set and Enjoy: ** Refrigerate the Oreo Balls for at least 15 minutes to allow the chocolate to set. Then, devour them with wild abandon! Or, you know, share them with friends and family. But I won’t judge if you keep them all for yourself.
Troubleshooting Your Truffles: Common Pitfalls and Solutions
Even the best bakers sometimes run into a snag. Don’t fret! Here are some common issues you might encounter and how to fix them:
- **Oreo Mixture Too Dry:** If your Oreo and cream cheese mixture is too crumbly and won’t form balls, add a tablespoon of milk or a touch more softened cream cheese until it reaches the right consistency.
- **Oreo Mixture Too Sticky:** If your Oreo mixture is too sticky and clings to everything, add more crushed Oreos until it’s easier to handle. Also, make sure you’ve chilled it long enough.
- **Chocolate Not Melting Smoothly:** If your chocolate is seizing up or becoming grainy, try adding a teaspoon of vegetable oil or shortening to help it melt smoothly. Avoid getting any water in the chocolate, as this can cause it to seize.
- **Chocolate Coating Too Thick:** If your chocolate coating is too thick, try thinning it out with a teaspoon of vegetable oil or shortening. You can also dip the Oreo Balls in the chocolate and then immediately place them on a wire rack to allow the excess chocolate to drip off.
- **Decorations Not Sticking:** If your sprinkles or other decorations aren’t sticking to the chocolate, make sure you’re adding them immediately after dipping the Oreo Balls, while the chocolate is still wet.
Oreo Ball Variations: Unleash Your Inner Mad Scientist
Okay, so you’ve mastered the classic Oreo Ball. Congratulations! But why stop there? The world of Oreo Ball possibilities is vast and exciting. Here are some fun variations to try:
- **Peanut Butter Bliss:** Add a tablespoon or two of peanut butter to the cream cheese mixture for a peanut butter cup-inspired treat.
- **Mint Chocolate Madness:** Use mint-flavored Oreos and a few drops of peppermint extract for a refreshing twist.
- **Birthday Cake Bonanza:** Use birthday cake Oreos and roll the finished balls in colorful sprinkles.
- **Salty Sweet Sensation:** Sprinkle a pinch of sea salt on top of the chocolate-covered balls for a delightful salty-sweet contrast.
- **Nutty Delight:** Roll the Oreo Balls in crushed nuts, such as pecans, walnuts, or almonds, for added texture and flavor.
- **Double Chocolate Decadence:** Use dark chocolate for the coating and add a tablespoon of cocoa powder to the Oreo mixture for an extra chocolatey experience.
The Grand Finale: Enjoying Your Oreo Ball Masterpieces
You’ve done it! You’ve created a batch of delicious, irresistible Oreo Balls. Now, the only thing left to do is enjoy them. Whether you’re sharing them with friends and family or indulging in a solo snacking session, these little bites of happiness are guaranteed to bring a smile to your face.
Serve them at parties, potlucks, or holiday gatherings. They’re always a crowd-pleaser. Pack them in lunchboxes for a sweet treat. Keep them in the fridge for a convenient and satisfying snack.
No matter how you choose to enjoy them, remember that Oreo Balls are more than just a dessert. They’re a symbol of fun, simplicity, and the joy of creating something delicious. So go ahead, take a bite, and savor the moment. You deserve it!
Frequently Asked Questions About Oreo Balls
Still have questions? Don’t worry, I’ve got you covered. Here are some of the most frequently asked questions about Oreo Balls:
**Can I use a different type of cookie?**
Absolutely! While Oreos are the classic choice, you can experiment with other cookies, such as chocolate chip cookies, graham crackers, or even gluten-free cookies. Just make sure the cookies are easily crushable.
**Can I use a different type of chocolate?**
Yes! Milk chocolate, dark chocolate, white chocolate—the choice is yours. You can even use melting wafers or candy melts for a variety of colors and flavors.
**How long do Oreo Balls last?**
Oreo Balls will last for up to a week in the refrigerator. Store them in an airtight container to keep them fresh.
**Can I freeze Oreo Balls?**
Yes, you can freeze Oreo Balls for up to two months. Wrap them individually in plastic wrap and then place them in a freezer-safe container. Thaw them in the refrigerator before serving.
**Can I make Oreo Balls ahead of time?**
Yes, you can make Oreo Balls ahead of time. In fact, they’re even better after they’ve been chilled for a few hours.
**What if I don’t have a double boiler?**
No problem! You can melt the chocolate in the microwave. Just heat it in 30-second intervals, stirring in between, to prevent burning.
**Are Oreo Balls kid-friendly?**
Absolutely! Oreo Balls are a fun and easy treat to make with kids. Just be sure to supervise them when they’re working with melted chocolate.
With these tips and tricks in mind, you’re well on your way to becoming an Oreo Ball master! So go forth and create some delicious memories!
Conclusion for Oreo Balls :
Oreo Balls are a simple yet stunning dessert that’s always a crowd-pleaser. With just a few ingredients and minimal effort, you can whip up a batch of these delightful treats in no time. From crushing the Oreos to adding your own creative twists, the process is as enjoyable as the final product. So, go ahead, indulge in the magic of these chocolatey, creamy bites and watch them disappear in a flash! They’re delicious and fun to make, and will surely be a great dessert!
Print
Oreo Balls
Delicious oreo balls recipe with detailed instructions and nutritional information.
- Total Time: 35 minutes
- Yield: 4 servings 1x
Ingredients
- 36 Oreo cookies
- 8 ounces cream cheese, softened
- 1 teaspoon vanilla extract
- 1/4 cup milk
- 12 ounces semi-sweet chocolate chips
- 1 tablespoon vegetable shortening
- Sprinkles (optional)
Instructions
- Step 1: Crush the Oreo cookies into fine crumbs. You can use a food processor or place the cookies in a resealable bag and crush them with a rolling pin.
- Step 2: In a large bowl, combine the crushed Oreo crumbs, softened cream cheese, vanilla extract, and milk. Mix well until a smooth, thick dough forms.
- Step 3: Roll the dough into 1-inch balls and place them on a baking sheet lined with parchment paper.
- Step 4: Freeze the Oreo balls for at least 30 minutes to firm them up.
- Step 5: While the Oreo balls are freezing, melt the chocolate chips and vegetable shortening in a double boiler or microwave in 30-second intervals, stirring in between, until smooth and completely melted.
- Step 6: Dip each frozen Oreo ball into the melted chocolate, coating it completely. Place the dipped balls back on the parchment-lined baking sheet. Sprinkle with sprinkles, if desired, before the chocolate sets. Allow the chocolate to harden completely before serving.
Notes
- Store leftover Oreo balls in an airtight container in the refrigerator for up to a week to keep them fresh.
- While not usually reheated, let refrigerated Oreo balls sit at room temperature for about 10 minutes to soften the chocolate slightly before serving.
- Serve these delightful treats chilled for a refreshing burst of Oreo goodness, or arrange them on a platter with other desserts for a party.
- For easier rolling and dipping, ensure the cream cheese is fully softened and the Oreo balls are thoroughly frozen before dipping.
- Prep Time: 15 minutes
- Cook Time: 20 minutes
- Method: Stovetop
- Cuisine: American
FAQs :
What is the best way to crush Oreos for Oreo Balls?
Listen, we’ve all been there – staring down a mountain of Oreos and a yearning for those delightful balls of chocolatey goodness. The food processor is your best friend here; it pulverizes those cookies in seconds. But if you’re feeling old-school (or just don’t want to wash another appliance), a ziplock bag and a rolling pin work wonders. Just bash away your frustrations until you have a bag full of fine Oreo crumbs. Just don’t take out your frustrations *too* much, you want crumbs, not dust!
Can I use different flavors of Oreos for this treat?
Absolutely! This is where the fun begins. Think golden Oreos for a vanilla twist, peanut butter Oreos for a nutty delight, or even those limited-edition flavors if you’re feeling adventurous. The world is your Oreo oyster! Just remember, the flavor of the Oreo will heavily influence the final taste of your Oreo Balls, so choose wisely. And maybe make a few different batches, just for science, of course. Experimenting with different oreo types can yield unexpected but pleasant results.
How long will Oreo Balls last, and how should I store them?
These little guys are surprisingly resilient. They’ll last in the fridge for up to a week, if they manage to survive that long without being devoured. Store them in an airtight container to prevent them from drying out or absorbing any funky fridge odors. You can also freeze them for longer storage; just thaw them in the fridge before serving. I highly doubt they’ll last that long since they are so tasty to eat! They’re perfect to share, but who are we kidding, they’re better all to yourself!
My Oreo Balls are too crumbly. What did I do wrong?
Ah, the dreaded crumbly Oreo Ball. This usually means you haven’t added enough cream cheese. The cream cheese is the glue that holds everything together, so don’t be shy with it! Add a tablespoon or two more at a time until the mixture comes together into a cohesive dough. Also, make sure your cream cheese is softened to room temperature; this will help it mix in more evenly and prevent lumps. Nobody wants lumpy Oreo Balls!


Leave a Comment