
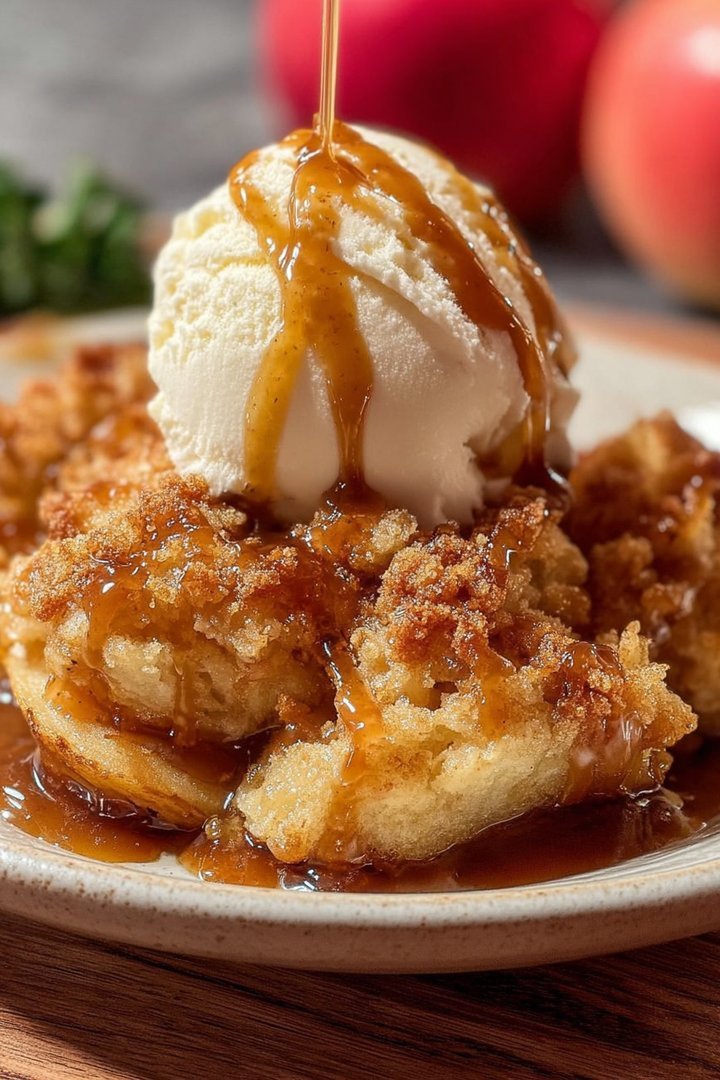
Oh, the warm, comforting embrace of a freshly baked **apple cobbler**! Imagine the sweet aroma of cinnamon-spiced apples mingling with a buttery, golden-brown crust.
This classic dessert evokes memories of cozy autumn evenings, grandma’s kitchen, and the pure joy of simple, homemade goodness. It’s the perfect treat to share with loved ones, bringing smiles and warmth with every spoonful.
Here’s why you’ll absolutely adore this recipe:
- It’s incredibly easy to make, perfect for beginner bakers or those seeking a quick dessert fix without sacrificing flavor.
- The delightful combination of sweet, tart apples and a crumbly, buttery topping creates an irresistible flavor profile.
- Visually stunning, the golden-brown crust and bubbling apple filling make it a show-stopping centerpiece for any table.
- Versatile enough to be enjoyed warm with a scoop of vanilla ice cream or at room temperature with a dollop of whipped cream.
Ingredients for Apple Cobbler
Here’s what you’ll need to make this delicious dish:
The full ingredients list, including measurements, is provided in the recipe card directly below.
How to Make Apple Cobbler
Follow these simple steps to prepare this delicious dish:
Step 1: Prepare the Apple Filling
In a large bowl, combine the sliced apples, granulated sugar, cinnamon, nutmeg, and lemon juice. Toss gently to coat the apples evenly with the sugar and spices. This step helps to draw out the apple’s juices and create a luscious filling.
Step 2: Make the Cobbler Topping
In a separate bowl, whisk together the all-purpose flour, brown sugar, and baking powder. Cut in the cold, cubed butter using a pastry blender or your fingers until the mixture resembles coarse crumbs. This is crucial for creating a tender and crumbly topping.
Step 3: Assemble the Cobbler
Pour the apple filling into a greased 8×8 inch baking dish. Evenly distribute the cobbler topping over the apple filling. Gently press the topping down so it adheres to the apples.
Step 4: Bake the Cobbler
Bake in a preheated oven at 375°F (190°C) for 35-40 minutes, or until the topping is golden brown and the apple filling is bubbly. Check for doneness by inserting a toothpick into the topping; it should come out clean. If the topping starts to brown too quickly, loosely tent the dish with foil.
Step 5: Cool and Serve
Let the cobbler cool slightly before serving. This allows the filling to thicken and prevents you from burning your tongue.
Step 6: Enjoy!
Serve warm, topped with a scoop of vanilla ice cream or a dollop of whipped cream. The contrast of the warm cobbler and the cold ice cream is simply divine. This **apple cobbler** is best enjoyed with good company and a steaming mug of coffee or tea.
Tips for the Perfect Apple Cobbler
Let’s be honest, even the simplest recipes sometimes need a little extra guidance. So, here are some tried-and-true tips to elevate your **apple cobbler** from “meh” to “magnificent”:
Apple Selection: The Key to Flavor Harmony
The type of apples you choose can dramatically impact the flavor and texture of your cobbler. I like to use a mix of sweet and tart apples for a balanced flavor profile. Granny Smith apples provide that delightful tartness, while Honeycrisp apples offer a juicy sweetness. Other great options include Fuji, Gala, or Braeburn. Experiment to find your perfect combination!
Butter: Cold as Ice, Please!
When making the cobbler topping, it’s crucial to use cold butter. The cold butter creates those coveted little pockets of buttery goodness that melt during baking, resulting in a tender and crumbly topping. If your butter starts to soften, pop it back in the freezer for a few minutes.
Spice It Up! (But Don’t Overdo It)
While cinnamon and nutmeg are classic choices for **apple cobbler**, don’t be afraid to experiment with other spices. A pinch of ginger, allspice, or even cardamom can add a unique twist to your cobbler. Just remember, a little goes a long way!
Prevent That Soggy Bottom
Nobody wants a soggy cobbler! To prevent this, ensure that your apple filling isn’t too watery. Toss the apples with the sugar and spices and let them sit for about 15 minutes. This will help to draw out some of the juices. Then, before pouring the filling into the baking dish, drain off any excess liquid.
The Golden Rule of Baking: Don’t Overbake!
Overbaking can lead to a dry and tough cobbler. Keep a close eye on your cobbler while it’s baking. It’s done when the topping is golden brown and the apple filling is bubbly. If the topping starts to brown too quickly, loosely tent the dish with foil to prevent it from burning.
Get Ahead: Prepare in Advance
Want to impress your guests without spending all day in the kitchen? You can assemble the **apple cobbler** ahead of time and store it in the refrigerator for up to 24 hours before baking. Just be sure to add a few extra minutes to the baking time.
Add a Touch of Texture
For a little extra crunch, consider adding some chopped nuts to the cobbler topping. Pecans, walnuts, or almonds would all be delicious choices. You can also sprinkle some turbinado sugar on top for a sparkly, crunchy finish.
Serving Suggestions: Beyond the Scoop
While a scoop of vanilla ice cream is always a winner, there are plenty of other ways to elevate your **apple cobbler**. Try topping it with a dollop of homemade whipped cream, a drizzle of caramel sauce, or even a sprinkle of cinnamon sugar.
Don’t Be Afraid to Customize
This **apple cobbler** recipe is just a starting point. Feel free to customize it to your liking. Add other fruits like berries or peaches, experiment with different spices, or try a different type of topping. The possibilities are endless!
Variations on the Classic Apple Cobbler Recipe
Now that you’ve mastered the basic **apple cobbler**, let’s explore some exciting variations that will tantalize your taste buds and keep your baking adventures fresh.
Caramel Apple Cobbler: A Decadent Delight
For an extra touch of indulgence, drizzle caramel sauce over the apple filling before adding the cobbler topping. The caramel will melt into the apples during baking, creating a rich and decadent treat. You can use store-bought caramel sauce or make your own from scratch.
Berry Apple Cobbler: A Fruity Fusion
Add a cup or two of your favorite berries to the apple filling for a burst of fruity flavor. Blueberries, raspberries, or blackberries would all be delicious choices. The berries will add a touch of sweetness and tartness that complements the apples perfectly.
Cranberry Apple Cobbler: A Festive Twist
For a festive holiday treat, add a cup of fresh or frozen cranberries to the apple filling. The cranberries will add a tart and tangy flavor that’s perfect for the Harvest celebration or Winter holiday season.
Spiced Pear and Apple Cobbler: A Warm and Cozy Combination
Replace half of the apples with pears for a warm and cozy cobbler that’s perfect for fall. The pears will add a subtle sweetness and a delicate flavor that complements the apples beautifully.
Gluten-Free Apple Cobbler: A Delight for Everyone
For a gluten-free version, simply substitute the all-purpose flour in the cobbler topping with a gluten-free all-purpose flour blend. Make sure to choose a blend that contains xanthan gum for the best texture.
Vegan Apple Cobbler: A Plant-Based Paradise
To make a vegan **apple cobbler**, substitute the butter in the cobbler topping with a vegan butter substitute. You can also use plant-based milk, such as almond milk or soy milk, in place of the milk.
Individual Apple Cobblers: Perfectly Portioned Treats
Instead of baking the cobbler in a large baking dish, divide the apple filling and cobbler topping among individual ramekins. This is a great way to create perfectly portioned desserts that are ideal for entertaining.
Dutch Apple Cobbler: A Crumbly Delight
For a Dutch **apple cobbler**, replace the traditional cobbler topping with a streusel topping made from flour, butter, sugar, and spices. The streusel topping will create a crumbly and crunchy texture that’s simply irresistible.
Frequently Asked Questions About Apple Cobbler
Even seasoned bakers have questions sometimes, so here are some frequently asked questions about **apple cobbler** to help you achieve baking success.
Can I use frozen apples in my apple cobbler?
Yes, you can use frozen apples in your **apple cobbler**. However, you’ll need to thaw them completely and drain off any excess liquid before using them. Frozen apples may release more liquid than fresh apples, so it’s important to take this into account.
How do I store leftover apple cobbler?
Leftover **apple cobbler** can be stored in the refrigerator for up to 3 days. Cover it tightly with plastic wrap or store it in an airtight container. You can reheat it in the oven or microwave before serving.
Can I freeze apple cobbler?
Yes, you can freeze **apple cobbler**. Let it cool completely before wrapping it tightly with plastic wrap and then foil. It can be frozen for up to 2 months. Thaw it in the refrigerator overnight before reheating.
How do I make my cobbler topping more crumbly?
To make your cobbler topping more crumbly, use cold butter and cut it into the flour mixture using a pastry blender or your fingers until the mixture resembles coarse crumbs. Avoid overmixing the dough, as this can result in a tough topping.
My apple cobbler is too watery. What can I do?
If your **apple cobbler** is too watery, try adding a tablespoon or two of cornstarch or tapioca starch to the apple filling. This will help to thicken the sauce. You can also drain off any excess liquid from the apple filling before adding it to the baking dish.
Can I use a different type of sweetener in my apple cobbler?
Yes, you can use a different type of sweetener in your **apple cobbler**. Maple syrup, honey, or agave nectar can all be used in place of granulated sugar. Just keep in mind that these sweeteners may alter the flavor and texture of the cobbler.
My cobbler topping is browning too quickly. What should I do?
If your cobbler topping is browning too quickly, loosely tent the dish with foil to prevent it from burning. This will allow the apple filling to cook through without overbrowning the topping.
Can I add nuts to my apple cobbler?
Yes, you can add nuts to your **apple cobbler**. Chopped pecans, walnuts, or almonds would all be delicious additions. Add them to the cobbler topping or sprinkle them over the apple filling before adding the topping.
How do I know when my apple cobbler is done?
Your **apple cobbler** is done when the topping is golden brown and the apple filling is bubbly. Insert a toothpick into the topping; it should come out clean. The internal temperature of the cobbler should be around 200°F (93°C).
Can I make apple cobbler in a slow cooker?
Yes, you can make **apple cobbler** in a slow cooker. Layer the apple filling in the bottom of the slow cooker and then top with the cobbler topping. Cook on low for 4-6 hours, or until the apples are tender and the topping is cooked through.
With these tips, variations, and FAQs in hand, you’re well on your way to baking the perfect **apple cobbler** every time. Happy baking!
Perfecting the Cooking Process
To achieve baking nirvana, start by prepping your apples and making the topping separately. This prevents a soggy bottom and ensures a golden-brown crust. Then, combine them right before baking for an evenly cooked, utterly delightful apple cobbler.
Add Your Touch
Feeling adventurous? Swap out some apples for pears or add a handful of cranberries for a tart twist. A sprinkle of cinnamon or nutmeg can also enhance the flavor. Feel free to experiment with different nuts in the topping, such as pecans or walnuts.
Storing & Reheating
Store your leftover cobbler in the refrigerator for up to three days. Reheat individual portions in the microwave or the whole cobbler in a preheated oven at 350°F (175°C) until warmed through. A scoop of vanilla ice cream is always a welcome addition!
Here are some tips to help you bake the best apple cobbler ever:
- Don’t overmix the topping batter. This keeps it light and crumbly, not tough.
- Use a mix of apple varieties for complex flavor – Granny Smith, Honeycrisp, and Gala work well.
- Let the cobbler cool slightly before serving to prevent a molten lava situation and allow the flavors to meld.
(Personal anecdote formated as paragraph subheading (very important! don’t write any title for this paragraph))
My first attempt at apple cobbler was a sticky, undercooked mess. Thankfully, my grandma swooped in with her wisdom, teaching me the importance of not overmixing the topping. Now, it’s a family favorite!
Conclusion for Apple Cobbler :
This classic apple cobbler is a comforting and delicious treat that’s easier to make than you might think. From choosing your favorite apples to experimenting with different spices, feel free to customize it to your liking. The result is a warm, flavorful dessert that’s perfect for any occasion. Don’t be intimidated – grab your ingredients, preheat your oven, and get ready to enjoy a slice of homemade happiness. It’s the perfect way to end any meal on a sweet note.
Print
Apple Cobbler
Delicious apple cobbler recipe with detailed instructions and nutritional information.
- Total Time: 35 minutes
- Yield: 4 servings 1x
Ingredients
- 6 medium apples, peeled, cored, and sliced
- 1 cup all-purpose flour
- 1 cup granulated sugar
- 1 teaspoon baking powder
- 1/2 teaspoon salt
- 1/2 cup milk
- 1/2 cup (1 stick) unsalted butter, melted
- 1 teaspoon ground cinnamon
Instructions
- Step 1: Preheat oven to 350°F (175°C). Grease a 9×13 inch baking dish.
- Step 2: In the prepared baking dish, arrange the sliced apples in an even layer. Sprinkle with cinnamon.
- Step 3: In a separate bowl, whisk together the flour, sugar, baking powder, and salt.
- Step 4: Stir in the milk until just combined. Gently fold in the melted butter.
- Step 5: Pour the batter evenly over the apples.
- Step 6: Bake for 45-50 minutes, or until the topping is golden brown and the apples are tender. Let cool slightly before serving.
Notes
- Store leftover apple cobbler in the refrigerator, covered, for up to 3 days.
- Reheat individual portions in the microwave for 30-60 seconds, or until warmed through.
- Serve warm apple cobbler with a scoop of vanilla ice cream or a dollop of whipped cream for extra indulgence.
- For a richer flavor, try browning the butter slightly before adding it to the batter.
- Prep Time: 15 minutes
- Cook Time: 20 minutes
- Method: Stovetop
- Cuisine: American
FAQs :
Can I use different apples for my Apple Cobbler?
Absolutely! The beauty of an apple cobbler lies in its versatility. While Granny Smiths provide a delightful tartness that complements the sweet topping, feel free to experiment. Honeycrisp apples offer a crisp texture and balanced sweetness. Braeburns bring a slightly spicy note. A mix of different apples creates a complex and interesting flavor profile. Just be sure to peel and core them before adding them to the dish. Embrace your inner apple artist! Don’t be afraid to try what works best for you.
How do I prevent my Apple Cobbler from becoming soggy?
Nobody wants a soggy cobbler, it is sad and unsatisfying. To prevent this culinary tragedy, make sure your apples are not overly juicy. If they are, you can toss them with a tablespoon of cornstarch or tapioca flour before adding them to the baking dish. Also, ensure your topping is properly baked and golden brown. A well-baked topping forms a protective barrier against the apple juices. Finally, let the cobbler cool slightly before serving. This allows the juices to thicken.
Can I make this Apple Cobbler ahead of time?
Yes, you can! Prepare the apple filling and topping separately. Store them in airtight containers in the refrigerator for up to 24 hours. When you’re ready to bake, simply assemble the cobbler and pop it in the oven. You might need to add a few extra minutes to the baking time since the ingredients will be cold. Freshly baked is always best, but a little planning never hurt anyone. This is a great way to simplify preparation.
What is the best way to store leftover Apple Cobbler?
Store leftover cobbler in an airtight container in the refrigerator. It will keep for up to three days. Reheat individual portions in the microwave or oven. For oven reheating, cover the cobbler with foil to prevent the topping from burning. While it’s delicious cold, warming it up restores some of that fresh-baked goodness. You could also add a scoop of vanilla ice cream on top. The flavor combinations are amazing.


Leave a Comment