
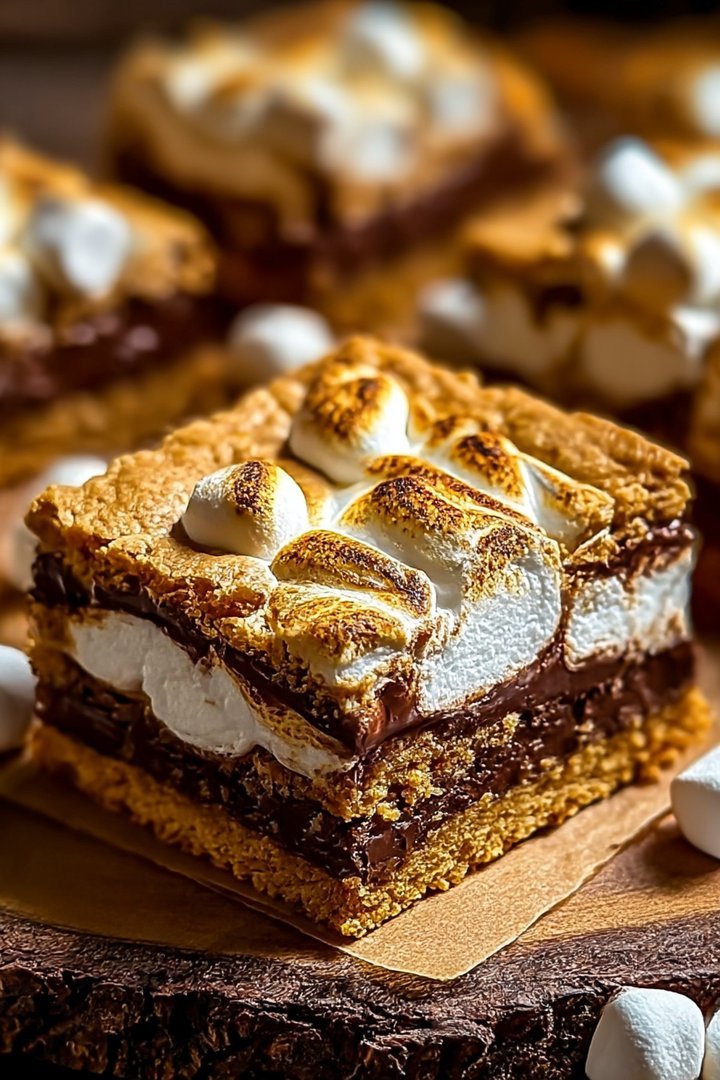
Imagine biting into a bar that’s a symphony of textures: the soft, chewy cookie base, the gooey melted marshmallow, and the satisfying snap of chocolate. These S’mores Cookie Bars aren’t just a dessert; they’re a miniature campfire celebration in every bite.
These bars are a playful twist on a classic treat, bringing the beloved campfire flavors right into your kitchen. Think gooey, chocolatey goodness with a hint of nostalgia, perfect for satisfying your sweet tooth any time of year.
- Effortlessly combines the comforting flavors of s’mores into a convenient cookie bar format, making it a quick and easy dessert.
- The harmonious blend of rich chocolate, gooey marshmallow, and buttery cookie creates an irresistible flavor experience that delights all ages.
- Visually appealing with its layered textures and golden-brown surface, these bars are perfect for sharing or gifting.
- Easily customizable with different types of chocolate or cookie bases, allowing for endless variations to suit your personal taste.
Ingredients for S’mores Cookie Bars
Here’s what you’ll need to make this delicious dish:
The full ingredients list, including measurements, is provided in the recipe card directly below.
How to Make S’mores Cookie Bars
Follow these simple steps to prepare this delicious dish:
Step 1: Prepare the Base
Preheat your oven to 350°F (175°C). Grease and flour a 9×13 inch baking pan to prevent sticking. This ensures your bars come out easily.
Step 2: Mix the Dough
In a large bowl, cream together the softened butter, granulated sugar, and brown sugar until light and fluffy. Beat in the eggs one at a time, then stir in the Alcohol-free vanilla extract. In a separate bowl, whisk together the flour, baking soda, and salt. Gradually add the dry ingredients to the wet ingredients, mixing until just combined.
Step 3: Layer the Goodness
Press half of the cookie dough into the prepared baking pan. Sprinkle evenly with half of the chocolate chips and half of the mini marshmallows. Crumble the graham crackers over the marshmallow layer.
Step 4: Top It Off
Drop spoonfuls of the remaining cookie dough over the graham cracker layer, then sprinkle with the remaining chocolate chips and marshmallows. Gently press down to help the layers adhere.
Step 5: Bake to Perfection
Bake for 25-30 minutes, or until the edges are golden brown and the marshmallows are melted and lightly toasted.
Step 6: Cool and Serve
Let the cookie bars cool completely in the pan before cutting into squares. This prevents them from falling apart.
Enjoy these S’mores Cookie Bars warm or at room temperature for a delightful treat any time of day!
Perfecting the Cooking Process
For the most delightful outcome, start by creaming your butter and sugars until fluffy. This creates a light base. Next, gently fold in the dry ingredients. Avoid overmixing to keep the bars tender. Lastly, layer your marshmallows and chocolate chips strategically for that perfect melt.
Add Your Touch
Want to jazz things up? Consider swirling in some peanut butter for a salty-sweet twist. Or, sprinkle a dash of sea salt on top to enhance the flavors. For a richer flavor, use brown butter in the cookie dough. Get creative and make them your own.
Storing & Reheating
To keep your S’mores Cookie Bars fresh, store them in an airtight container at room temperature for up to three days. To reheat, pop a bar in the microwave for about 10 seconds for that gooey, melty goodness. Enjoy them warm for the best experience.
Here are some helpful tips for creating the best S’mores Cookie Bars:
- Ensure your butter is softened, not melted, for the ideal cookie dough consistency. This helps create a chewy texture, not a flat, greasy mess.
- Don’t overcrowd the marshmallows; a single layer ensures even melting and prevents them from becoming a sticky, burnt disaster.
- Let the bars cool completely before cutting to avoid a gooey, crumbling mess. Patience is a virtue, especially with dessert.
(Personal anecdote formated as paragraph subheading (very important! don’t write any title for this paragraph))
I remember once making these for a friend’s birthday. Everyone devoured them so quickly, I barely got one myself! That’s when I knew I had a winning recipe.
Okay, gather ’round, cookie comrades! Let’s talk about something near and dear to my heart (and probably yours too): S’mores Cookie Bars. Forget those campfire singalongs and mosquito bites. We’re bringing the s’mores experience indoors, elevating it, and making it socially acceptable to eat an entire pan in one sitting. Don’t judge; we’ve all been there.
Why S’mores Cookie Bars? Because Life Is Too Short for Boring Desserts
Seriously, think about it. What’s not to love? You’ve got the comforting crunch of a cookie, the gooey sweetness of melted marshmallows, and the decadent richness of chocolate. It’s like a party in your mouth, and everyone’s invited. But unlike real parties, you don’t have to make small talk or pretend to enjoy Uncle Jerry’s off-key karaoke. Just pure, unadulterated dessert bliss.
Plus, let’s be honest, traditional s’mores are a logistical nightmare. Open flames, sticky fingers, and the ever-present threat of setting your eyebrows on fire? No thanks. These S’mores Cookie Bars are all the fun with none of the potential for follicular damage.
The Anatomy of a Perfect S’mores Cookie Bar: Deconstructing Deliciousness
Now, before you dive headfirst into this recipe, let’s break down the key components. This isn’t just about throwing some ingredients together and hoping for the best. We’re aiming for perfection, people! Think of it like building a tiny edible skyscraper, but instead of offices, it’s filled with happiness.
The Cookie Base: The Foundation of Flavor
This isn’t just any cookie dough, mind you. We’re talking about a chewy, slightly crisp base that can stand up to the weight of its marshmallow and chocolatey overlords. A good tip is to use a combination of granulated and brown sugar. Brown sugar adds moisture and a subtle molasses flavor that complements the other ingredients beautifully. And don’t skimp on the Alcohol-free vanilla extract. It elevates everything.
The Marshmallow Layer: The Gooey Glue That Binds Us
Ah, marshmallows. Those puffy clouds of sugary goodness. For this recipe, we’re using standard-sized marshmallows, but feel free to get fancy with the jumbo ones if you’re feeling adventurous. Pro tip: lightly press the marshmallows into the cookie dough before baking. This helps them adhere and prevents them from sliding off the bars when you try to cut them (trust me, I’ve learned this the hard way).
The Chocolate Chips: Because Chocolate Makes Everything Better
Semi-sweet, milk chocolate, dark chocolate… the choice is yours! I personally prefer semi-sweet because it strikes the perfect balance between sweet and slightly bitter. But hey, if you’re a chocoholic, go wild! Just make sure to use good quality chocolate chips. They’ll melt more evenly and have a richer flavor. A mixture of chocolate chunks and chips is also a great way to get varied textures.
Recipe Time: Let’s Bake These S’mores Cookie Bars!
Alright, enough chit-chat. Let’s get down to the nitty-gritty. Here’s what you’ll need to create these little squares of happiness:
**Ingredients: **
- 1 cup (2 sticks) unsalted butter, softened
- ¾ cup granulated sugar
- ¾ cup packed light brown sugar
- 2 large eggs
- 1 teaspoon Alcohol-free vanilla extract
- 2 ¼ cups all-purpose flour
- 1 teaspoon baking soda
- 1 teaspoon salt
- 2 cups semi-sweet chocolate chips
- 1 (10-ounce) package large marshmallows
**Instructions: **
1. Preheat your oven to 350°F (175°C). Grease a 9×13 inch baking pan. Nobody wants their cookie bars stuck to the pan. That’s just sad.
2. In a large bowl, cream together the softened butter, granulated sugar, and brown sugar until light and fluffy. I use my stand mixer for this, but you can use a hand mixer or even do it by hand if you’re feeling ambitious.
3. Beat in the eggs one at a time, then stir in the Alcohol-free vanilla extract.
4. In a separate bowl, whisk together the flour, baking soda, and salt. This ensures even distribution of the dry ingredients. Nobody wants a pocket of salt in their cookie bars.
5. Gradually add the dry ingredients to the wet ingredients, mixing until just combined. Be careful not to overmix. Overmixing leads to tough cookies, and nobody wants tough cookies.
6. Stir in 1 ½ cups of the chocolate chips. Reserve the remaining ½ cup for topping.
7. Press half of the cookie dough into the prepared baking pan. An offset spatula helps get an even layer.
8. Arrange the marshmallows in a single layer over the cookie dough. Lightly press them in.
9. Crumble the remaining cookie dough over the marshmallows. It doesn’t have to be perfect!
10. Sprinkle the remaining ½ cup of chocolate chips over the top.
11. Bake for 25-30 minutes, or until the edges are golden brown and the marshmallows are melted and slightly toasted. Keep a close eye on them. Nobody likes burnt marshmallows (well, some people do, but let’s not cater to the extremists).
12. Let the bars cool completely in the pan before cutting into squares. This is the hardest part, I know. But trust me, it’s worth the wait.
Variations and Upgrades: Leveling Up Your S’mores Game
Okay, so you’ve mastered the basic recipe. Now it’s time to get creative! Here are a few ideas to take your S’mores Cookie Bars to the next level:
Peanut Butter Swirl S’mores Cookie Bars
Swirl in a generous dollop of peanut butter into the cookie dough before baking. The salty-sweet combination is divine. Just make sure you don’t have any peanut allergies in the house!
Pretzel S’mores Cookie Bars
Add crushed pretzels to the cookie dough for a salty, crunchy twist. This is a great way to balance out the sweetness of the marshmallows and chocolate.
Salted Caramel S’mores Cookie Bars
Drizzle salted caramel sauce over the baked cookie bars. This is a guaranteed crowd-pleaser. Bonus points if you make your own caramel sauce.
Graham Cracker Crumble Topping
Pulse a handful of graham crackers in a food processor until finely ground. Sprinkle the crumbs over the marshmallows before baking for an extra touch of s’mores authenticity.
S’mores Cookie Bars: The Verdict
So there you have it! Everything you need to create the most epic S’mores Cookie Bars the world has ever seen. Whether you’re baking them for a party, a potluck, or just a cozy night in, these bars are guaranteed to bring a smile to your face. Go forth and bake, my friends, and may your marshmallows always be perfectly toasted!
Conclusion for S’mores Cookie Bars :
These S’mores Cookie Bars are the ultimate treat for anyone who loves the classic campfire dessert. They are simple to make, endlessly customizable, and guaranteed to bring a smile to your face. So, gather your ingredients, preheat your oven, and get ready to experience the magic of s’mores in a whole new way. The delightful combination of chewy cookie, rich chocolate, and gooey marshmallows is a guaranteed crowd-pleaser. So go on, give them a try. You won’t regret it!
Print
S’mores Cookie Bars
Delicious s’mores cookie bars recipe with detailed instructions and nutritional information.
- Total Time: 35 minutes
- Yield: 4 servings
Ingredients
- All-purpose flour: 1 1/2 cups
- Unsalted butter, softened: 1/2 cup (1 stick)
- Granulated sugar: 1/2 cup
- Brown sugar, packed: 1/2 cup
- Large egg: 1
- Vanilla extract: 1 teaspoon
- Baking soda: 1/2 teaspoon
- Milk chocolate bars, broken into pieces: 6 ounces
- Marshmallow creme: 7 ounces
Instructions
- Step 1: Preheat oven to 350°F (175°C). Grease and lightly flour a 9×13 inch baking pan.
- Step 2: In a large bowl, cream together the softened butter, granulated sugar, and brown sugar until light and fluffy. Beat in the egg and vanilla extract.
- Step 3: In a separate bowl, whisk together the flour and baking soda. Gradually add the dry ingredients to the wet ingredients, mixing until just combined.
- Step 4: Press half of the dough into the prepared baking pan. Top with the milk chocolate pieces and then dollops of marshmallow creme.
- Step 5: Crumble the remaining dough over the marshmallow creme.
- Step 6: Bake for 20-25 minutes, or until golden brown. Let cool completely before cutting into bars.
Notes
- To keep your s'mores cookie bars soft, store them in an airtight container at room temperature for up to 3 days.
- For a warm, gooey treat, microwave individual bars for 10-15 seconds before serving.
- Serve these bars with a scoop of vanilla ice cream and a dusting of graham cracker crumbs for an extra touch of s'mores magic.
- For easier crumbling, chill the remaining dough for 15 minutes before topping the marshmallow creme.
- Prep Time: 15 minutes
- Cook Time: 20 minutes
- Method: Stovetop
- Cuisine: American
FAQs :
What makes these S’mores Cookie Bars so incredibly delicious?
Okay, picture this: a chewy, buttery cookie base that’s practically begging for attention. Then, a generous layer of melted chocolate that’s so rich, it should probably be paying taxes. But wait, there’s more! We’re talking gooey, toasted marshmallows on top, creating that classic campfire vibe without the hassle of, you know, actually building a fire. It’s like a s’mores party in your mouth, and everyone’s invited. The combination of textures and flavors will have you hooked from the first bite. Trust me, these aren’t your average cookies.
Can I customize these S’mores Cookie Bars with different toppings?
Absolutely! Get creative! While the classic graham cracker, chocolate, and marshmallow combo is a winner, feel free to experiment. Try adding chopped nuts for extra crunch, or a swirl of peanut butter for a little something extra. You could even sprinkle some sea salt on top to balance the sweetness. The possibilities are endless! Just remember to keep the base ratios relatively similar so that the structural integrity of the cookie bar is not compromised. These bars are incredibly versatile, so go ahead and make them your own!
How do I prevent the marshmallows from burning when baking these S’mores Cookie Bars?
Ah, the age-old question of marshmallow management! The key is to add the marshmallows towards the end of the baking time. Bake the cookie base almost all the way through, then add the marshmallows and broil them for just a minute or two, keeping a close eye on them. This way, they’ll get that perfectly toasted, golden-brown color without turning into charcoal briquettes. Nobody wants burnt marshmallows, unless you are into that sort of thing, but let’s be honest, you aren’t.
What’s the best way to store these S’mores Cookie Bars to keep them fresh?
To keep these little slices of heaven tasting their best, store them in an airtight container at room temperature. They’ll stay fresh for about 3-4 days. If you want to keep them longer, you can freeze them! Just wrap them individually in plastic wrap and then place them in a freezer-safe bag. When you’re ready to indulge, let them thaw at room temperature. Be warned, though: these bars are so addictive, they probably won’t last that long anyway! Enjoy your S’mores Cookie Bars.


Leave a Comment