
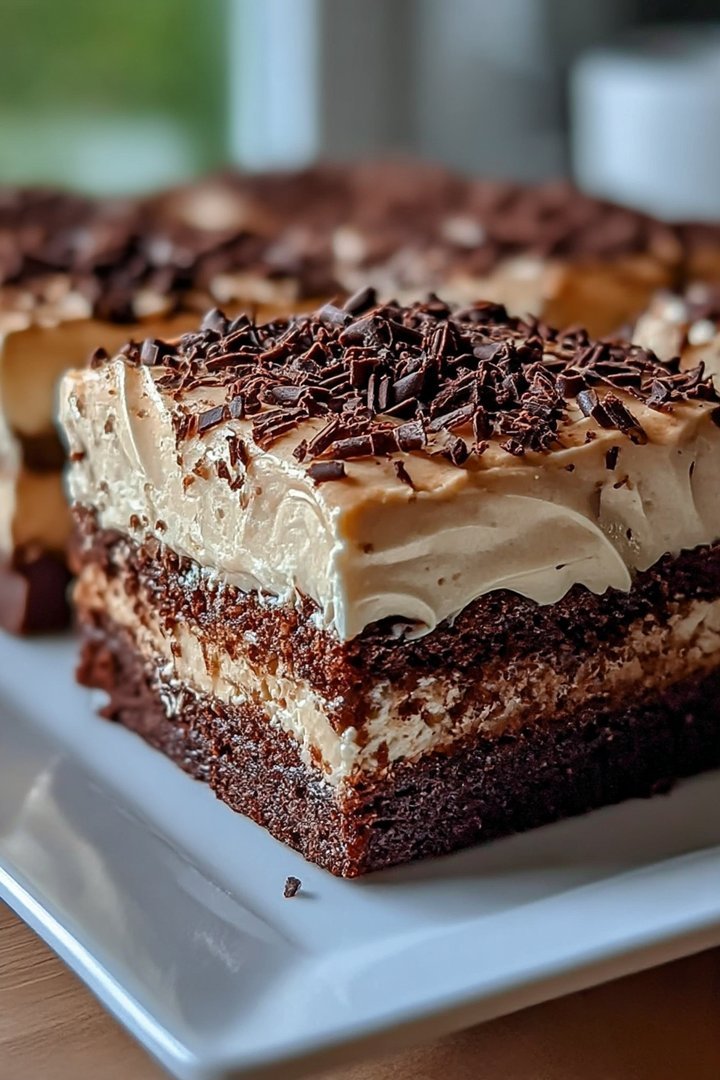
Imagine layers of fudgy brownie, swirled with creamy vanilla pudding, and topped with chocolate shavings. This **Brownie Refrigerator Cake** is a symphony of textures and tastes that is easy to make.
Each bite of this **Brownie Refrigerator Cake** brings rich brownie flavor, smooth pudding, and melt-in-your-mouth chocolate. It’s the perfect dessert for potlucks, parties, or a special treat.
Here are just a few reasons to fall in love with this recipe:
- Effortless assembly, perfect for those days when baking feels like climbing a mountain.
- A decadent mix of rich brownie, creamy pudding, and delightful chocolate shavings.
- Visually stunning with its layered construction, guaranteed to impress your guests.
- Customize it with your favorite toppings for a dessert that’s uniquely yours and delicious.
Ingredients for Brownie Refrigerator Cake
Here’s what you’ll need to make this delicious dish:
The full ingredients list, including measurements, is provided in the recipe card directly below.
How to Make Brownie Refrigerator Cake
Follow these simple steps to prepare this delicious dish:
Step 1: Bake the Brownies
Prepare the brownie mix according to the package directions, using eggs, vegetable oil, and water. Bake in a greased 9×13 inch pan at 350°F (175°C) for the time recommended on the box, or until a toothpick inserted into the center comes out with moist crumbs. Let the brownies cool completely.
Step 2: Prepare the Pudding
In a large bowl, whisk together the instant vanilla pudding mix and milk until smooth and thickened. Let it set for a few minutes to reach the desired consistency.
Step 3: Assemble the Cake
Once the brownies are cool, crumble them into a large bowl. In a 9×13 inch dish, create the first layer by spreading half of the crumbled brownies evenly. Next, spread half of the prepared vanilla pudding over the brownie layer. Repeat with the remaining brownies and pudding.
Step 4: Top it Off
Spread the whipped topping evenly over the final layer of pudding. Sprinkle chocolate shavings over the whipped topping for a beautiful and delicious finish.
Step 5: Chill and Serve
Cover the dish with plastic wrap and refrigerate for at least 2 hours, or preferably overnight, to allow the flavors to meld together and the cake to set.
Step 6: Enjoy!
Before serving, slice the cake into squares and garnish with additional chocolate shavings if desired. The brownie refrigerator cake is best served chilled and enjoyed with a smile!
Perfecting the Cooking Process
To make this brownie refrigerator cake with seamless execution, start by preparing the brownie base, then move on to crafting the creamy layers while the brownie cools. Assembling everything in stages ensures each component retains its ideal texture, and it all comes together perfectly.
Add Your Touch
Feeling adventurous? Swap out the alcohol-free vanilla extract for alcohol-free almond extract in the cream layers. Mix in some chopped nuts like walnuts or pecans for added crunch. For a fruity twist, swirl in a layer of raspberry or strawberry jam between the brownie and cream.
Storing & Reheating
Store your brownie refrigerator cake in an airtight container in the refrigerator for up to 3 days. This dessert is best enjoyed cold, straight from the fridge. It’s not recommended to freeze or reheat it, as it may affect the texture.
Here are some tips to make the best possible brownie refrigerator cake:
- Ensure your brownie layer is completely cool before adding the cream layers to prevent melting and ensure a neat presentation.
- Use high-quality chocolate for the brownie base to enhance the overall richness and depth of flavor in the dessert.
- Chill the assembled cake for at least 4 hours, or preferably overnight, to allow the flavors to meld and the layers to set properly.
(Personal anecdote formated as paragraph subheading)
I remember the first time I made this, my family devoured it in minutes! My little cousin even asked for the recipe, and now it’s a staple at our family gatherings. It’s become a treasured dessert.
Let’s dive into the delectable world of this no-bake dessert, a masterpiece that’s surprisingly simple to create. This brownie refrigerator cake isn’t just a dessert; it’s an experience, a journey into the realm of chocolatey, creamy bliss. And trust me, it’s the kind of indulgence that’ll have you sneaking back for seconds, maybe even thirds.
I know what you might be thinking: “Another cake recipe? Really?” But hold on, because this isn’t just *any* cake. We’re talking about a no-bake wonder, a layered symphony of textures and flavors that comes together with minimal effort. It’s perfect for those days when you crave something decadent but can’t bear the thought of turning on the oven. Plus, it’s a guaranteed crowd-pleaser. Prepare yourself; this **Brownie Refrigerator Cake** will become your secret weapon for potlucks, parties, and even those “treat yourself” moments.
Why This Brownie Refrigerator Cake is a Game Changer
Okay, let’s get real. There are approximately a gazillion dessert recipes out there, so why should you dedicate your precious time to *this* particular recipe? Well, let me break it down for you:
- **No-Bake Bliss:** Did I mention it’s no-bake? This is a lifesaver during the sweltering summer months or when you’re simply too lazy to deal with preheating and timers.
- **Impressive Presentation:** This *Brownie Refrigerator Cake* looks like you spent hours slaving away in the kitchen, when in reality, it’s deceptively easy to assemble. Think elegant layers, rich colors, and a visually appealing final product.
- **Customizable Delight:** Don’t like a particular ingredient? Swap it out! This recipe is incredibly versatile, allowing you to tailor it to your exact taste preferences.
- **Make-Ahead Marvel:** Need a dessert for a party tomorrow? No problem! This cake actually tastes *better* after it’s been chilling in the fridge for a while, allowing the flavors to meld together beautifully.
Basically, this *Brownie Refrigerator Cake* is the dessert equivalent of a superhero. It’s quick, easy, impressive, and always ready to save the day (or at least, your dessert cravings).
The Anatomy of a Perfect Brownie Refrigerator Cake
So, what exactly goes into this magical creation? Let’s break it down layer by delicious layer:
- **The Brownie Base:** This is the foundation of our masterpiece. We’re talking about a fudgy, chocolatey brownie that provides the perfect contrast to the creamy layers above. Think rich, dense, and utterly irresistible. We’re not baking, so we’ll use pre-made brownies to make it even more efficient.
- **The Creamy Dream:** This is where the magic really happens. A luscious combination of cream cheese, whipped topping, and a touch of sweetness creates a velvety smooth texture that melts in your mouth. It’s light, airy, and perfectly balanced to complement the richness of the brownie.
- **The Chocolate Ganache (Optional but Highly Recommended):** A glossy, decadent chocolate ganache drizzled over the top adds a touch of elegance and intensifies the chocolatey goodness. It’s the perfect finishing touch to elevate this dessert to the next level.
Each layer plays a crucial role in creating the ultimate *Brownie Refrigerator Cake* experience. It’s a symphony of textures and flavors that will leave you wanting more.
Ingredients: Gather Your Arsenal
Before we dive into the nitty-gritty of the recipe, let’s make sure you have all the necessary ingredients. Here’s what you’ll need:
- **For the Brownie Layer:** Pre-made brownies.
- **For the Creamy Filling:** 8 ounces cream cheese, softened; 1 container (8 ounces) whipped topping, thawed; 1/2 cup powdered sugar; 1 teaspoon alcohol-free vanilla extract.
- **For the Chocolate Ganache (Optional):** 4 ounces semi-sweet chocolate chips; 1/4 cup heavy cream.
Make sure your cream cheese is properly softened for a smooth and lump-free filling. Trust me, it makes a difference!
Step-by-Step Guide: From Zero to Hero
Alright, let’s get cooking! Or rather, let’s get assembling. Here’s a step-by-step guide to creating your very own *Brownie Refrigerator Cake*:
1. **Prepare the Brownie Base: ** Line the bottom of a 9×13 inch dish with parchment paper. Arrange the brownies to completely cover the bottom of the dish. You may need to cut the brownies to fit.
2. **Make the Creamy Filling: ** In a large bowl, beat the softened cream cheese until smooth and creamy. Gradually add the powdered sugar and alcohol-free vanilla extract, and continue beating until well combined. Gently fold in the thawed whipped topping until everything is evenly incorporated.
3. **Assemble the Cake: ** Spread the creamy filling evenly over the brownie layer.
4. **Make the Chocolate Ganache (Optional): ** Place the chocolate chips in a heatproof bowl. Heat the heavy cream in a saucepan until it just begins to simmer. Pour the hot cream over the chocolate chips and let it sit for a minute to melt the chocolate. Gently whisk until smooth and glossy. Drizzle the ganache over the creamy layer.
5. **Chill: ** Cover the dish with plastic wrap and refrigerate for at least 4 hours, or preferably overnight, to allow the flavors to meld and the layers to set.
That’s it! You’ve successfully created a *Brownie Refrigerator Cake*. Now, prepare for the accolades to roll in.
Pro Tips and Tricks: Level Up Your Cake Game
Want to take your *Brownie Refrigerator Cake* to the next level? Here are a few pro tips and tricks:
- **Get Creative with the Brownies:** Use different flavors of brownies for added complexity. Think chocolate chip, peanut butter, or even salted caramel brownies.
- **Add a Crunchy Element:** Sprinkle chopped nuts, crushed cookies, or even pretzels between the layers for added texture.
- **Infuse the Creamy Filling:** Add a tablespoon of coffee flavored syrup (or a strong coffee concentrate for a non-alcoholic version) to the creamy filling for a mocha twist.
- **Garnish with Flair:** Before serving, garnish the cake with fresh berries, chocolate shavings, or a dusting of cocoa powder for a visually stunning presentation.
Remember, cooking is all about experimentation, so don’t be afraid to get creative and put your own spin on this recipe!
Variations: Unleash Your Inner Cake Artist
The beauty of this *Brownie Refrigerator Cake* is that it’s incredibly versatile. Here are a few variations to inspire your inner cake artist:
- **Peanut Butter Cup Cake:** Add a layer of peanut butter between the brownie and the creamy filling. Garnish with chopped peanut butter cups.
- **Cookies and Cream Cake:** Crush Oreo cookies and sprinkle them between the layers.
- **Salted Caramel Cake:** Drizzle salted caramel sauce over the creamy filling and sprinkle with sea salt.
The possibilities are endless! Let your imagination run wild and create your own unique *Brownie Refrigerator Cake* masterpiece.
Troubleshooting: Common Issues and Solutions
Even the best chefs encounter the occasional hiccup. Here are a few common issues you might encounter while making this cake, along with their solutions:
- **Creamy Filling is Too Runny:** Make sure your cream cheese is properly softened and that you don’t over-mix the filling. If it’s still too runny, add a tablespoon of cornstarch to help thicken it.
- **Brownies are Too Dry:** Brush the brownies with a simple syrup (equal parts sugar and water, heated until the sugar dissolves) before adding the creamy filling to add moisture.
- **Ganache is Too Thick:** Add a tablespoon of milk or cream to thin it out.
Don’t panic! Most issues can be easily fixed with a little tweaking.
Serving Suggestions: The Grand Finale
Finally, it’s time to serve your masterpiece! Here are a few serving suggestions:
- **Serve it Cold:** This cake is best enjoyed cold, straight from the refrigerator.
- **Pair it with Ice Cream:** A scoop of vanilla or chocolate ice cream adds a delightful contrast of temperatures and textures.
- **Add a Beverage:** A glass of cold milk or a cup of hot coffee makes the perfect accompaniment to this decadent dessert.
And most importantly, savor every bite! You deserve it.
This *Brownie Refrigerator Cake* is more than just a dessert; it’s a celebration of chocolate, cream, and all things delicious. So go ahead, gather your ingredients, and get ready to create a dessert that will impress your friends, delight your family, and leave you feeling like a culinary superstar. Happy baking (or rather, assembling)!
Conclusion for Brownie Refrigerator Cake:
This Brownie Refrigerator Cake is the perfect no-bake dessert for any occasion. With layers of fudgy brownies, fluffy whipped cream, and fresh fruit, it’s a guaranteed crowd-pleaser. Easy to customize and even easier to devour, it’s a dessert that brings joy with every bite. So, gather your ingredients, get creative, and prepare to impress everyone with your effortless baking skills. This recipe is a winner!
Print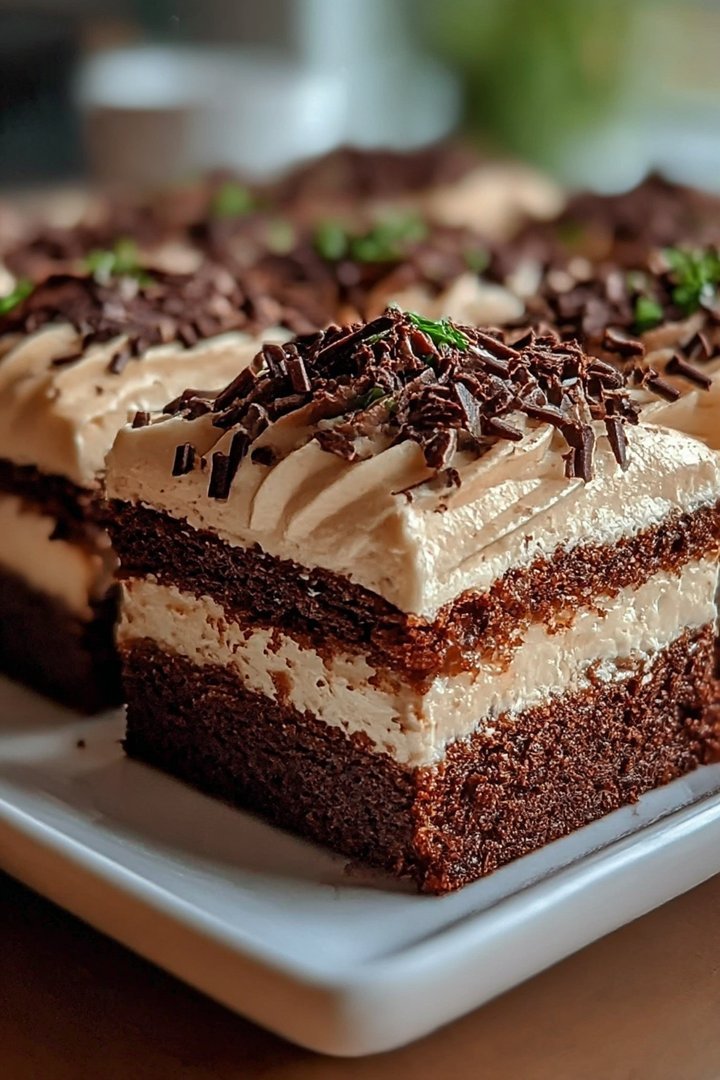
Brownie Refrigerator Cake
Delicious brownie refrigerator cake recipe with detailed instructions and nutritional information.
- Total Time: 35 minutes
- Yield: 4 servings 1x
Ingredients
- Box brownie mix (and ingredients called for on the box)
- 1 cup heavy cream
- 2 tablespoons powdered sugar
- 1 teaspoon vanilla extract
- 1 (8 ounce) package cream cheese, softened
- 1/2 cup chocolate sauce, divided
- 1/4 cup chopped nuts (optional)
- 1/4 cup mini chocolate chips (optional)
Instructions
- Step 1: Prepare brownie mix according to package directions. Let cool completely and cut into 1-inch cubes.
- Step 2: In a large bowl, whip the heavy cream with powdered sugar and vanilla extract until stiff peaks form.
- Step 3: In a separate bowl, beat the softened cream cheese until smooth. Gently fold in half of the whipped cream.
- Step 4: In a 9×13 inch dish, layer half of the brownie cubes, half of the cream cheese mixture, and drizzle with half of the chocolate sauce.
- Step 5: Repeat layers with remaining brownie cubes, cream cheese mixture, and chocolate sauce.
- Step 6: Top with remaining whipped cream, chopped nuts, and mini chocolate chips (if using). Cover and refrigerate for at least 2 hours before serving.
Notes
- For the richest flavor, let the assembled cake chill overnight – it gives the brownie and cream cheese layers a chance to meld beautifully.
- If you want a warm, gooey treat, microwave individual slices for about 15-20 seconds, but be careful not to melt the cream cheese!
- This cake is delicious on its own, but a scoop of vanilla ice cream really elevates the experience.
- Don't overmix the cream cheese mixture; gentle folding keeps the texture light and airy, preventing a dense cake.
- Prep Time: 15 minutes
- Cook Time: 20 minutes
- Method: Stovetop
- Cuisine: American
FAQs:
Can I use a different kind of brownie for this Brownie Refrigerator Cake?
Absolutely! The beauty of this dessert lies in its adaptability. If you’re not a fan of classic chocolate brownies, feel free to experiment with blondies, red velvet brownies, or even gluten-free options. Just make sure they’re fudgy enough to hold their shape and absorb the moisture from the whipped cream and fruit. A denser brownie will work better than a cakey one. You can even get adventurous and use a mix of different brownie flavors for a truly unique treat. So go wild, unleash your inner baker, and create a refrigerator cake masterpiece that reflects your personal taste!
How long will the Brownie Refrigerator Cake last in the refrigerator?
This Brownie Refrigerator Cake is best enjoyed within 2-3 days. After that, the brownies might start to get a little soggy, and the fruit could lose its freshness. To keep it at its peak, store it in an airtight container in the refrigerator. This will help prevent it from drying out or absorbing any unwanted flavors from other foods. While it might be tempting to make a huge cake to last the whole week, trust me, it’s so delicious that it probably won’t survive that long anyway. Consider it a delicious challenge to finish it before it loses its optimal texture and flavor!
What kind of fruit works best in this refrigerator cake recipe?
The sky’s the limit when it comes to fruit choices for your Brownie Refrigerator Cake! Berries like strawberries, raspberries, blueberries, and blackberries are always a fantastic option, adding a burst of freshness and vibrant color. Sliced bananas, peaches, or nectarines also work beautifully. If you’re feeling a little more adventurous, try adding some tropical fruits like mango or pineapple. Just be sure to use fruits that are ripe but still firm enough to hold their shape. Avoid overly juicy fruits that might make the brownies too soggy. Remember, the goal is to create a delicious balance of textures and flavors that will make your taste buds sing!
Can I add other layers or fillings to my Brownie Refrigerator Cake creation?
Definitely! Think of the recipe as a blueprint, not a rigid set of rules. Get creative and customize your Brownie Refrigerator Cake with other delicious layers and fillings. Consider adding a layer of chocolate ganache, a swirl of peanut butter, or even a sprinkle of chopped nuts for added texture. You could also incorporate a layer of cheesecake filling for an extra layer of richness and tang. The possibilities are endless! Just make sure that each layer complements the others and contributes to the overall flavor profile. Remember, baking is all about experimentation and having fun, so don’t be afraid to push the boundaries and create a refrigerator cake that is uniquely yours!


Leave a Comment